In this section, you'll be learning about
Let's assess your contributions so far: the Vehicle Inspection form makes Rocky Jupiter drivers check various parts of their truck, generated from a reference table. The Rocky Jupiter specifications, however, also require a way to have drivers select a truck for themselves to inspect and then drive off.
You don't want to let drivers pick a truck that is not assigned to them, so you'll
want to filter the list of trucks by the current user of the form. For this, you'll
access the user system parameter which references the current form
fill session, and specifies the current user of your form.
You also don't want to allow the driver to select more than one truck, so you'll have to make your form count user input in the form.
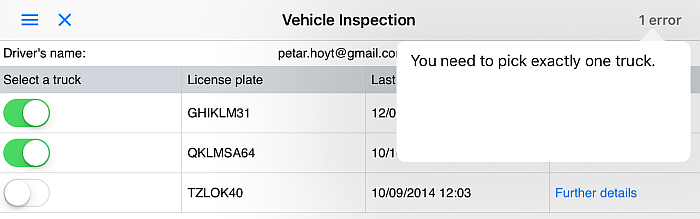
Figure 89. This is what you'll be making in this section - the user's name is displayed at the top, and the user cannot submit the form if more than one truck is selected in the table
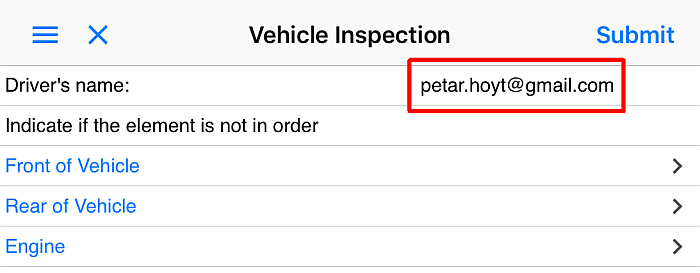
Put the user's name in the header of the form
It's a nice touch to call the user of your form by name when you're showing them a
form. What's even nicer is that it's very easy to do. The usersystem parameter, accessible in data binding queries as
sysp.user, will return the e-mail address of the mobile
user who is currently logged in.
It is assumed in these tutorials that you are using the Petar Hoyt test persona. Your mileage may vary as regards code snippets and screenshots if you're logged in as a different user.
Go ahead and replace the licensePlatetextbox in the form with a textview that displays
the driver's username. (You'll introduce a much better way to get the truck's
details in a minute anyway.)
That's it. Any user who opens the form will see their username in the header.
Create the reference table for the trucks
You received a spreadsheet from the client that lists the Rocky Jupiter truck fleet - the specifications require you to reference and display this data in your form, and you're ready for it.

This probably doesn't need repeating, but you won't be able to upload any input data
to the Cloud without a reference table to contain it. To create a reference table,
upload a reference table declaration. As before, the input data must match the
structure determined by the declaration file. Because you've got the input data
spreadsheet first, you'll have to base the reference table declaration file off it.
Let's call the reference table
vehicles:
<Reftab Name="vehicles" xmlns="http://schemas.mobilengine.com/reftab/v1">
    <Columns>
        <Column Name="driver" Type="Text" NotNull="true"/>
        <Column Name="barcode" Type="Text" NotNull="true"/>
        <Column Name="plate" Type="Text" NotNull="true"/>
        <Column Name="make" Type="Text" NotNull="true"/>
        <Column Name="model" Type="Text" NotNull="true"/>
        <Column Name="year" Type="Integer" NotNull="true"/>
        <Column Name="color" Type="Text" NotNull="true"/>
        <Column Name="engine" Type="Text" NotNull="true"/>
        <Column Name="fuel" Type="Text" NotNull="true"/>
        <Column Name="transmission" Type="Text" NotNull="true"/>
        <Column Name="drivetrain" Type="Text" NotNull="true"/>
        <Column Name="last_service" Type="Date" NotNull="true"/>
    </Columns>
</Reftab>
Download the reftab.xlsx spreadsheet with
the new input data worksheet already baked in, and publish it using the
mebt along with vehicles.refem.
Display the data in a table control.
A table control is very much like the
repeater that you're familiar with: it displays tabular
data in the form based on a template defined by its children. It also uses the
same recordset and record mechanism to query
tabular data and to iterate over its rows. The only real difference is that
table has a more rigid template: a required row
child with one or more cells,
not to mention the optional header and footer rows.
Let's see how this works; it won't bite.
...
<table id="vehicleTable"
    recordset='{SELECT v.driver,
                        v.plate,
                        v.last_service,
                        v.barcode,
                        v.make,
                        v.model,
                        v.year,
                        v.color,
                        v.engine,
                        v.fuel,
                        v.transmission,
                        v.drivetrain
                        FROM vehicles v
                        WHERE v.driver=sysp.user}'
    record="vehicle">
    <header>
        <row>
            <cell>
                <textview text="License plate"/>
            </cell>
            <cell>
                <textview text="Last service"/>
            </cell>
            <cell>
                <textview text="Barcode"/>
            </cell>
            <cell>
                <textview text="Make"/>
            </cell>
            <cell>
                <textview text="Model"/>
            </cell>
            <cell>
                <textview text="Year"/>
            </cell>
            <cell>
                <textview text="Color"/>
            </cell>
            <cell>
                <textview text="Engine"/>
            </cell>
            <cell>
                <textview text="Fuel"/>
            </cell>
            <cell>
                <textview text="Transmission"/>
            </cell>
            <cell>
                <textview text="Drivetrain"/>
            </cell>
        </row>
    </header>
    <row>
        <cell>
            <textview text='{vehicle.plate}'/>
        </cell>
        <cell>
            <textview text='{FORMATDTL(vehicle.last_service,
                            (dtf d"/"MM"/"yyyy" "HH":"mm))}'/>
        </cell>
        <cell>
            <textview text='{vehicle.barcode}'/>
        </cell>
        <cell>
            <textview text='{vehicle.make}'/>
        </cell>
        <cell>
            <textview text='{vehicle.model}'/>
        </cell>
        <cell>
            <textview text='{TOSTRING(vehicle.year)}'/>
        </cell>
        <cell>
            <textview text='{vehicle.color}'/>
        </cell>
        <cell>
            <textview text='{vehicle.engine}'/>
        </cell>
        <cell>
            <textview text='{vehicle.fuel}'/>
        </cell>
        <cell>
            <textview text='{vehicle.transmission}'/>
        </cell>
        <cell>
            <textview text='{vehicle.drivetrain}'/>
        </cell>
    </row>
</table>
...
There's
a header (lines 18-54) and a row (lines 55-90)
with eleven cell controls each, that all hold a
textview. The textview controls reference
the row of the reference table returned in the recordset query
via the record (vehicle) to display the
details for the trucks. Told you it was just like a
repeater.
Trouble is, this table is huge. See for yourself: save the form, publish along with the reference tables, and open on your device. You will have to scroll, and scroll a lot to see all the columns.
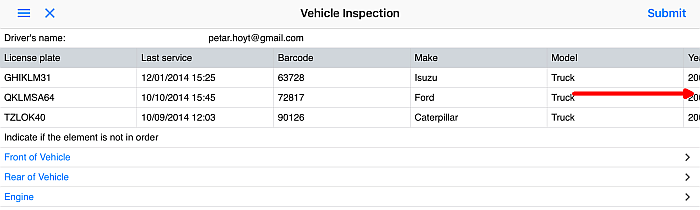
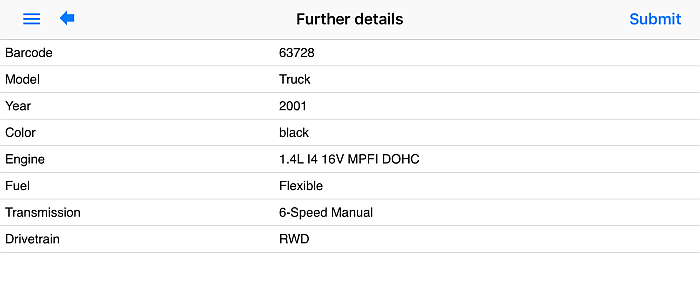
A solution would be to have four instead of eleven columns in your
table: three columns for the most important truck details,
and a fourth one that contains a popup that contains all the
other columns.
It sounds more complicated than it is:
...
<table id="vehicleTable"...
    record="vehicle">
    <header>
...
    </header>
    <row>
...
        <cell>
            <popup title="Further details">
                <textview label="Barcode" text='{vehicle.barcode}'/>
                <textview label="Model" text='{vehicle.model}'/>
                <textview label="Year" text='{TOSTRING(vehicle.year)}'/>
                <textview label="Color" text='{vehicle.color}'/>
                <textview label="Engine" text='{vehicle.engine}'/>
                <textview label="Fuel" text='{vehicle.fuel}'/>
                <textview label="Transmission" text='{vehicle.transmission}'/>
                <textview label="Drivetrain" text='{vehicle.drivetrain}'/>
            </popup>
        </cell>
    </row>
</table>
...
A
popup in a table cell is just a workaround to shoehorn more
than one child control into the cell control. The
textview controls all work as any other control inside the
table, referencing the result of the
recordset through the record property.
Save the form, publish, and open to see if the shortened table
fits across the screen.
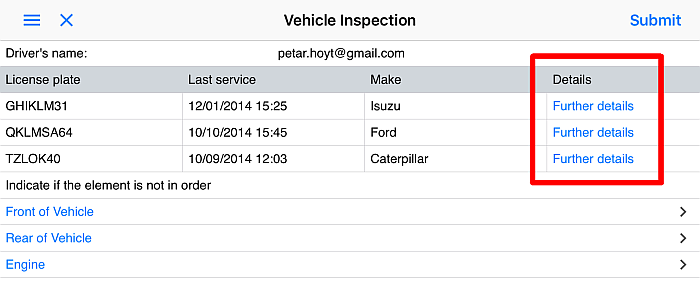
It does, doesn't it. And should your user really be interested in the
truck's color, they can tap Further details.
All right, but the whole point of this table is letting the user select a
truck. How is that coming along?
Give the user a way to mark one of the rows in the table: a
checkbox.
Selecting a checkbox won't
actually make any difference in this fictional workflow, since you haven't
put any workflow scripts in place to process the form submission. There is,
however, a section dedicated to letting users add or delete reference table rows.
It's just a matter of adding an extra
cell to the row template. However, if you
still want to make the table fit the mobile screen, you'll have to shove another
column into the popup. Make
perhaps?
...
<table id="vehicleTable"...>
    <header>
        <row>
            <cell>
                <textview text="Select a truck"/>
            </cell>
...
        </row>
    </header>
    <row>
        <cell>
            <checkbox id="selector"/>
        </cell>
        <cell>
            <textview text='{vehicle.plate}'/>
        </cell>
        <cell>
            <textview text='{FORMATDTL(vehicle.last_service,
                            (dtf d"/"MM"/"yyyy" "HH":"mm))}'/>
        </cell>
        <cell>
            <popup title="Further details">
...
            </popup>
        </cell>
    </row>
</table>
...
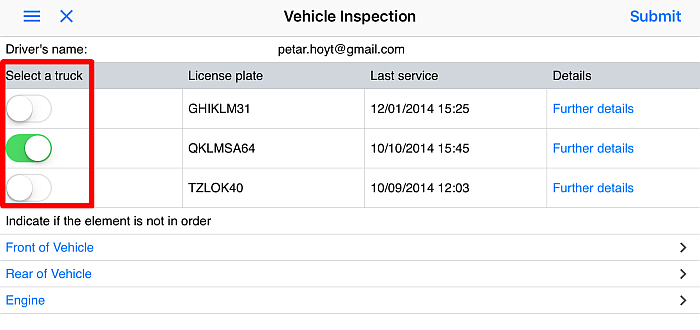
Can you see the problem? There's nothing to stop the esteemed user from
selecting more than one truck. That would defeat the purpose of the client.
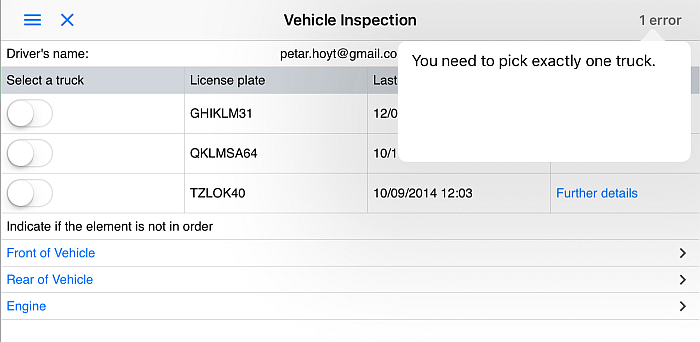
Make the form require and accept only one selected row
You'll need to make the form check that the user has selected a truck before you let them submit the form. On the other hand, you also want to prevent the user from selecting more than one truck.
A validator element is the one you're looking for: it will
reliably prevent form submission if your conditions aren't met. Associate it with
the vehicleTabletable:
The
cond data-binding expression in the validator
adds up all the rows displayed in the table control using the
COUNT function and the rows property where the checkbox is
checked.
Because validation and
declaration elements are traits (and not children) of their
containing controls, the validator needs the
rows property (instead of the record) to
access the template.
Save, publish, and check:
Awesome! In the next (and final!) section of this tutorial, you'll learn about
declaring variables in Mobilengine forms, and get your hands on yet more exciting
controls to play around with.