

Segmented button
Welcome back to Rocky Jupiter HQ! What was the point of this detour into data-binding, you ask? It taught you about data-binding, without which
you wouldn't be able to unlock the full potential of Mobilengine forms, the
repeater control that you will put to increasingly
versatile use in your solutions, and the dropdown control, which works exactly like the
segmentedbuttons you'll be adding in this section. And besides,
knowledge is its own reward.
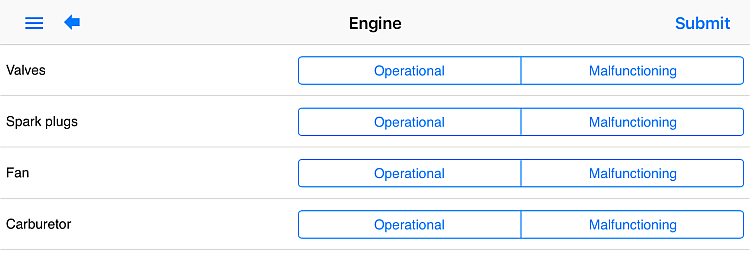
When you first asked the driver in your form to report on various parts of his or her
truck, you used checkbox controls. They seemed like a good idea at
the time, but having the On selection state of a toggle control represent a
problem is unintuitive at best. The Mobilengine form language has a control type
much better suited for this job, and now you've got what it takes to use it.
The segmentedbutton control is closely related to the dropdown control in that it too presents mutually exclusive
choices. Because it's single-line, it saves space and works best for two or three
options. Ideal for the Yes/No nature of a car part checkup.
In syntax terms, segmentedbuttons are just like a
dropdown:
<form id='vehicleInspection'...>
...
    <popup title="Front of Vehicle">
        <segmentedbutton id="Fleaks"
            label="Fuel/Oil leaks"
            choices='{["Operational", "Malfunctioning"]}'
            keyMap='{v}'
            textMap='{v}'/>
        <segmentedbutton id="Fsecurity"
            label="Load security"
            choices='{["Operational", "Malfunctioning"]}'
            keyMap='{v}'
            textMap='{v}'/>
...
    </popup>
...
</form>
The
same choices, keyMap, and
textMap. And because the query statement in
choices is a list, automatic column alias assignment kicks in, and both keyMap and
textMap properties are
{v}
Let's try this out, shall we? Save, publish, and open on your mobile as before.
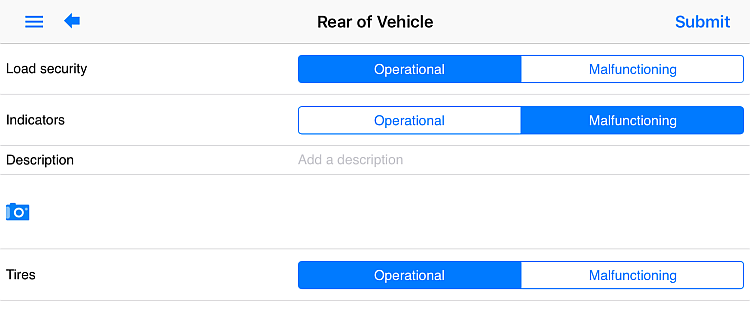
All right, but aren't we missing something? You had this lovely
if control going on where there was a neat
photo control under each checkbox when it was
selected. Where did that go?
Let's resurrect the if and its photo buddy, with a
new condition that refers to the segmentedbutton. You need the
data-binding expression in the cond to evaluate to
true when the user selects the
Malfunctioning option. This calls for the
segmentedbutton's selectedKey property, which
uniquely identifies the user's choice in the
control.
<form id='vehicleInspection'...>
...
    <popup title="Front of Vehicle">
        <segmentedbutton id="Fleaks"
            label="Fuel/Oil leaks"
            choices='{["Operational", "Malfunctioning"]}'
            keyMap='{v}'
            textMap='{v}'/>
        <if id="f1"
            cond='{Fleaks.selectedKey == "Malfunctioning"}'>
            <textbox id="description"
                label="Description"
                hint="Add a description"/>
            <photo id="photo"/>
        </if>
...
    </popup>
...
</form>
Because
the list bound into the segmentedbutton's choices
has no key or text columns, you have no choice
but to put the string value of the option itself into the if
control's condition. The if has been given an identifier so that
it creates a separate naming scope for its children, and the textbox
controls can all have the same id in the form.
Save the new form, publish, and check if the textbox and
photo really do appear only when you want them to.
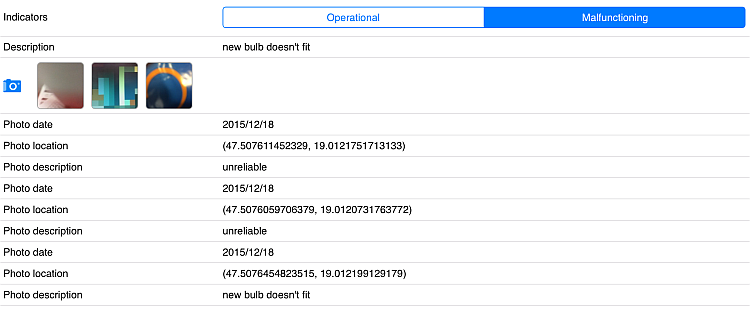
Location detection and the photoData property.
That's really nice, but if you save and publish the form, you won't have anything
to show for your hard work data-binding all that stuff into
photoData. What if you let the driver know also that there
better not be any funny business because you and Rocky Jupiter have proof of
when and where each of the images were taken?
You can make each of the photoData records show up in the form
below the photo control, as rows returned in a
repeater's recordset. (Remember the
repeater?) The fields of these image records are
accessible through the photo control's read-only photos
property; this is what you'll be binding into the
recordset.
Mobilengine data-binding uses the SELECT ... FROM SQLite query statement syntax to reference columns in a table. Don't worry about it for now; volume 2 of the repeater-saga will reveal more.
Stick a textview control inside the repeater to
display the metadata, and put the whole thing inside the if,
since it should only show up when the photo control itself
does.
<form id='vehicleInspection'...>
...
    <popup title="Front of Vehicle">
        <segmentedbutton id="Fleaks".../>
        <if id="f1"
            cond='{Fleaks.selectedKey == "Malfunctioning"}'>
            <textbox id="description".../>
            <photo id="photo"
                photoData='{SELECT datetimeCreated date,
                            locationCreated.latitude lat,
                            locationCreated.longitude long,
                            description.text description}'/>
            <repeater
                recordset='{SELECT p.date, p.lat, p.long, p.description
                            FROM photo.photos p}'
                record='rp'>
                <textview id='date'
                    label='Photo date'
                    text='{FORMATDTL(rp.date, (dtf yyyy"/"MM"/"dd))}'/>
                <textview id='location'
                    label='Photo location'
                    text='{"("
                            || TOSTRING(rp.lat)
                            || ", "
                            || TOSTRING(rp.long)
                            || ")"}'/>
                <textview id='desc'
                    label='Photo description'
                    text='{rp.description}'/>
            </repeater>
        </if>
...
    </popup>
...
</form>
Now you can very proudly save and publish the form, safe in the knowledge that users will be bowled over when they tap the photo icon to take shots of their trucks.
This form is all coming together nicely.
Validation
The last item on the first iteration of the spec for the form is making the car part check-up mandatory. The driver should not be able to submit the form without providing feedback on every one of the car parts listed. Armed with your trusty data-binding wonder weapon, this should be a breeze.
To prevent form submission unless certain conditions are met, the Mobilengine form
language includes the validation and its validator
child elements. Its cond property returns a boolean value (just like the
cond in an if). For example, if you want to
make sure that one of the options is selected for a
segmentedbutton, the cond should evaluate to
true if the selectedKey is
null.
<form id='vehicleInspection'
    ...location='fine'>
...
    <popup title="Front of Vehicle">
        <segmentedbutton id="Fleaks"
            label="Fuel/Oil leaks"
            choices='{["Operational", "Malfunctioning"]}'
            keyMap='{v}'
            textMap='{v}'>
            <validation>
                <validator cond='{selectedKey IS NOT NULL}'
                    message='Please check the element.'/>
            </validation>
        </segmentedbutton>
...
    </popup>
...
</form>
validators
have a message property that is displayed to inform the user of the
reason for refusing the Submit command.
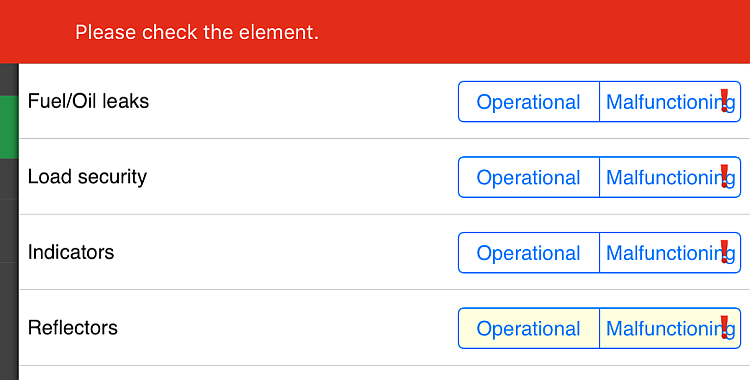
Figure 69. The app provides feedback and doesn't let the user submit the form
without input in the segmentedbuttons
Save and publish as usual. On your mobile device, fill in the form (or don't, and suffer the consequences), then submit.
Congratulations. You've reached the end of part 1. You are now officially a Level 1 Mobilengine Ninja.