This is a good time to recap what you've accomplished so far:
-
you created a battery of segmented buttons to ask the user if a variety of car parts are operational
-
you grouped the car parts-related controls into popup panels for a neat and well-organized look
-
your form notifies the user if he or she tries to submit the form without input in the segmented buttons
Now, you'll make your form ready for change.
It's kind of a drag to have to manually enter the names of the car parts in the
segmentedbutton controls in your form. If the number or names
of the car parts you want to show changes, you don't want to have to come back to
the form again. You want your form to update automatically.
You can use the data-binding concept and technique you've mastered to do this - the only difference being that this time you bind the form elements to a reference table that lists the relevant car parts, instead of other form elements.
This is a typical set-and-forget operation - once the link is established, you'll never have to touch the source code again to keep the data up-to-date. Whenever the data in the reference table that your bind to changes, the linked controls and values in the form will display the new values the next time the form is opened. A server-side workflow script triggered by a form submission, a webform submission, or an incoming integration message, as well as a human administrator at Rocky Jupiter can modify the list of car parts, and popups and segmented buttons displayed in the form will change accordingly.
Create and populate reference tables in the Mobilengine Cloud
All reference data lives in a reference table in the cloud. You need to create a reference table before you can populate it with data.
To create a reference table, you write and publish its reference table declaration to the Mobilengine Cloud.
The
declaration is an XML with the custom .refem extension. In the
declaration, you specify the number and name of the columns that the reference table
has, and the type of data that can be put inside those columns.
When you compile and publish the
declaration with the mebt tool, a reference table based on the
declaration will be generated in the Cloud.
Declare and publish reference tables
To start you off gently, let's create three single-column reference tables: one for each of the car parts listed in the Front of Vehicle, Rear of Vehicle, and Engine popups.
In your text editor, create the reference table declarations, and save them as an
XML file with the name partsFront.refem,
partsRear.refem, and partsEngine.refem
inside the RockyJupiter
folder:
Except
for the Reftab element's Name attribute,
all three declaration files are identical. This is why it will make perfect
sense to roll them up into a single table in the next section.
The piece of code above declares a reference table with a single Column
named part_name. The data type of
the values in the column must be Text, and the column must have
data (NotNull="true"). This is just what you need.
Launch the command line, and publish the c:\RockyJupiter folder
to the Mobilengine Cloud. This creates the partsFront,
partsRear, and partsEngine reference
tables on the Mobilengine Cloud. Check for yourself: log in to the Backoffice
website, and click the Input data tab.

OK, you've got the schemas ready and waiting. Let's inject some actual data into these reference table shells.
Insert data into a published reference table
Reference data can get into reference tables
-
when an Editor- or Administrator-level Backoffice user imports a spreadsheet with the input data (Using the Import button in the upper left in the screenshot above.),
-
when a developer such as your lucky self uses the
mebtto publish an input data spreadsheet, -
or when a server-side script inserts one or more rows into it.
Any spreadsheet that you import or publish must have the same name as and must conform to the reference table declaration of the reference table that you want to populate.
It's the second option that seems the most interesting, right? Here's how to go about publishing one or more spreadsheet:
Fire up Microsoft Excel, and create the spreadsheets that will hold your
reference data: they must have the same number of columns and in the same order
as you specified in one of the declarations, and the columns need to have the
same names. In our case this means you create three spreadsheets, each with a
single part_name column that contains text data. In the
rows, enter the car part names in the appropriate popup
control, and add Spare parts kit to one or more of them
to see if it shows up in your form.
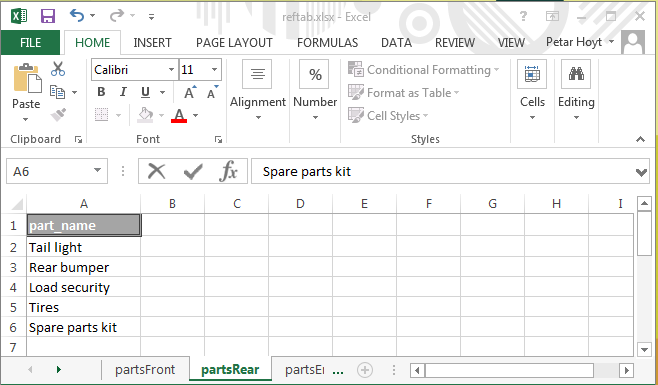
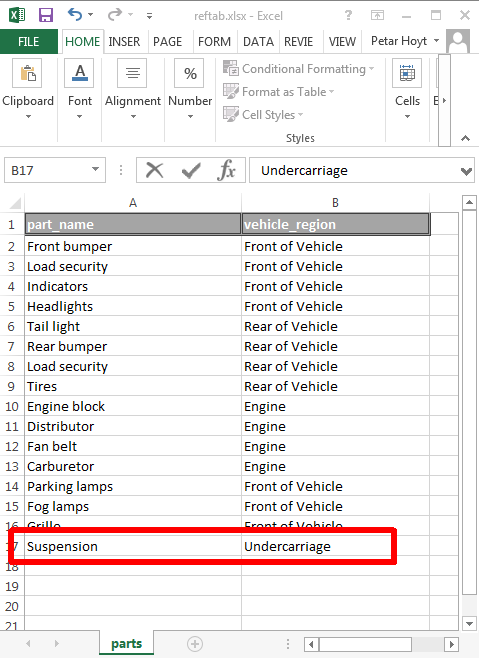
Figure 71. The reftab.xlsx spreadsheet with three worksheets.
Note the extra row to test the data binding.
The Backoffice only supports the import and publishing of a single
.xlsx-extension spreadsheet for reference data import.
However, each worksheet of the spreadsheet is considered a separate input data
table.
Name the worksheets partsFront,
partsRear, and partsEngine to
conform to the declaration file, and save the spreadsheet as
reftab.xlsx (so that you can use Notepad++ to publish it to the Cloud) in
RockyJupiter.
Time for the mebt. This is your first time
publishing a spreadsheet to the Cloud, so take note: whenever you are including
a spreadsheet, you need to add its path to the mebt command:
c:\RockyJupiter>mebt run . reftab.xlsx
Service url: https://tutorial.mobilengine.com/services/comex/v1/
User: petar.hoyt@gmail.com
adding 'partsEngine.refem'
adding 'partsFront.refem'
adding 'partsRear.refem'
Create reference table 'partsEngine'
Create reference table 'partsFront'
Create reference table 'partsRear'
Reset integration settings
No changes for form 'vehicleInspection'
Import reference tables
Processing table 'partsEngine'
Rows added: 4, deleted: 0, modified: 0, empty: 0.
Processing table 'partsFront'
Rows added: 7, deleted: 0, modified: 0, empty: 0.
Processing table 'partsRear'
Rows added: 5, deleted: 0, modified: 0, empty: 0.
Done.
The mebt says Rows added: with non-zero
numbers, so our reference table now has reference data in it. Let's go and link
this data to a control in your Vehicle Inspection form.
Link controls to reference data
How will these
single-column reference tables free you from having to hard-code the
segmentedbutton controls in your form? You can set the column
data to generate the controls for you, with the help of the repeater wrapper
control.
A repeater takes a table value (a recordset
in its aptly named recordset attribute), and dutifully
generates its children controls for each record
returned. When you first used a repeater, you simply stuck a
table literal into the recordset: this time, you'll use the
part_name column of one of your new reference tables, and
wrap the segmentedbutton and the if in the
popup controls inside
it:
...
<popup id='front' title="Front of Vehicle">
    <repeater id='partsList'
        record='part'
        recordset='{SELECT p.part_name FROM partsFront p}'>
        <segmentedbutton id='yesNo'label='{part.part_name}'
            choices='{["Operational", "Malfunctioning"]}'
            keyMap='{v}'
            textMap='{v}'>
...
        </segmentedbutton>
        <if cond='{yesNo.selectedKey == "Malfunctioning"}'>
...
        </if>
    </repeater>
</popup>
...
Mobilengine uses a modified SQL query statement to query table columns; note the required table alias in line 5.
You no longer need more than one segmentedbutton in the
popup. As long as you reference the rows returned by its
parent repeater (using its record attribute like before), the form will
contain all the controls that it did before.
Modify all three of the popup controls so that they each
reference their appropriate partsFront,
partsRear, and partsEngine reference
tables, save, and publish, not forgetting reftab.xlsx
from the mebt command.
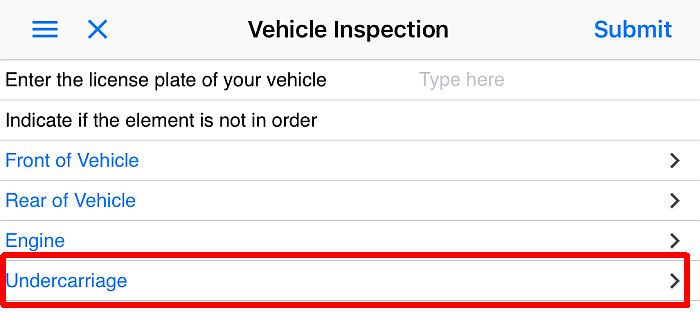
Success! The extra Spare parts kit row shows up as a bonus
without you having to manually type it into the code.
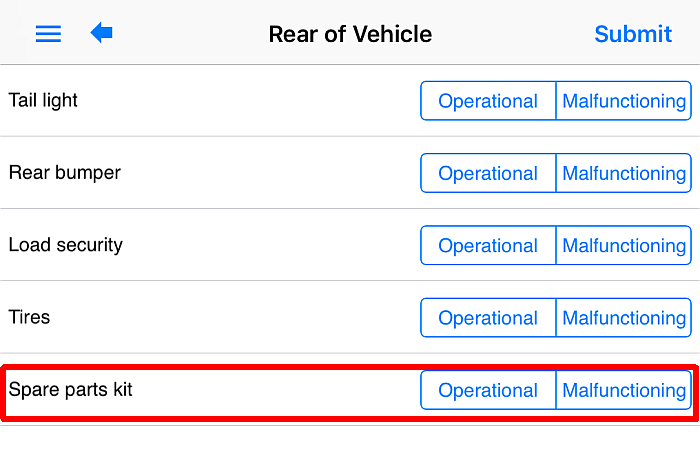
Figure 72. The test row in the reference table is displayed as a
segmentedbutton control inside the
repeater
Streamlining the data-bound elements and the reference table
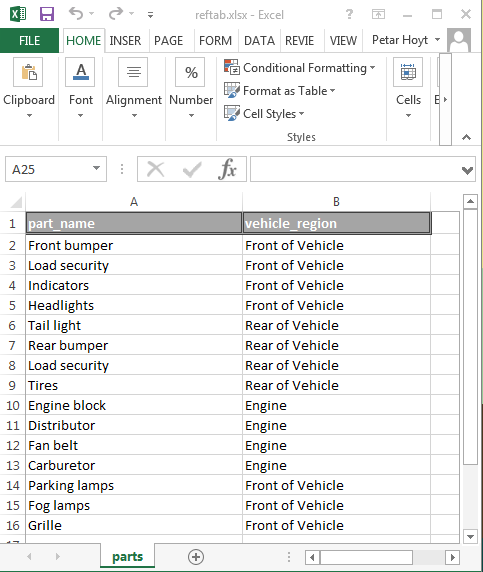
Having three reference tables that each have a single column with the same name
seems like a waste. The car parts in your reference tables seem destined to be
combined into a single table with a second column that determines the region of
the truck they belong to. You could call the new column
vehicle_region, and the combined table
parts, for example.
Modifying a reference table means editing its declaration file. The second column is just like the first in everything but name:
A spreadsheet that conforms to the declaration is also necessary. Download and save the new reftab.xlsx to your solutions folder.
This is where things get interesting. You used the
part_name column to generate the
segmentedbutton controls - you could use the
vehicle_region column to generate their
popup parents! When you read 'generate', you immediately
thought repeater, right? One that wraps around the
popup in the previous version of the form, and generates a
popup for every row in the vehicle_region
column:
<form id='vehicleInspection'...>
...
    <repeater id="vehicleRegions"
        record="region"
        recordset='{SELECT DISTINCT a.vehicle_region FROM parts a}'>
        <popup title='{generator.vehicle_region}'>
            <repeater id='partsList'
                record='part'
                recordset='{SELECT p.part_name,
                            p.vehicle_region
                            FROM parts p
                            WHERE p.vehicle_region=region.vehicle_region}'>
                <segmentedbutton id='yesNo'
                    label='{part.part_name}'
                    choices='{["Operational", "Malfunctioning"]}'
                    keyMap='{v}'
                    textMap='{v}'>
...
                </segmentedbutton>
                <if cond='{yesNo.selectedKey == "Malfunctioning"}'>
...
                </if>
            </repeater>
        </popup>
    </repeater>
</form>
The
nested repeaters have actually eliminated repetition: one
popup and one segmentedbutton control is
all you need, since both are now templates. Make sure that you insert the
DISTINCT keyword in the outer
repeater's query statement (line 5) to get rid of
duplicates, and to modify the inner repeater's query (lines 10
and 12) to reference both columns of the new parts table, and
to filter the query by the vehicle region returned in the parent
repeater.
Save and publish vehicleInspection.fls.xml,
parts.refem, and reftab.xlsx. Open the
form and check that it still looks the same. You might not have obvious visual
proof, but you've cut down on the necessary amount of code and done tons for the
easy maintainability of the Vehicle Inspection form.
Modify the reference data through the Backoffice website
With data binding you can separate the structure and the content of your solution artifacts - even an administrator at your client's company can modify the data-bound content in your form without doing any coding at all.
Editor-level users of the Backoffice site can export the input data spreadsheets that you publish to the Mobilengine Cloud, open and edit them, and then re-import. The modified reference data will then show up on users' mobile devices.
Let's walk through the process and add a new row to parts.xlsx as a
test.
Log in to the Backoffice site, and go to the Input data tab. Click Export in the upper left. Select the parts check box, and click OK. The input data spreadsheet will open in your default spreadsheet editor.
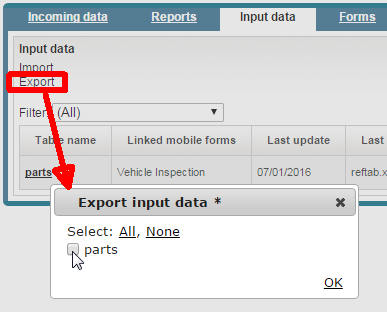
Figure 74. The Export button and the Export input data dialog on the Input data tab of the Backoffice website
Add the a real or fictional car part and associated vehicle region to the reference table, and save the file.
Back on the Input data tab of the Backoffice website, click the Import button this time.
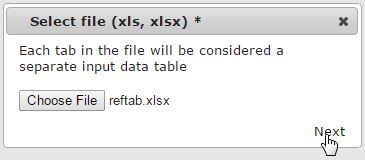
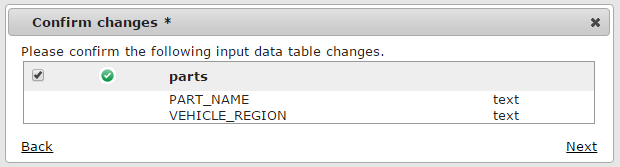
In the dialog that pops up, browse for the modified spreadsheet, click Next, and confirm the changes.
Synchronize the mobile client or wait for it to sync. Open the form, and smile appreciatively.
This was just a test exercise to demonstrate editing input data spreadsheets over the Backoffice site. This change in the spreadsheet will be reverted, but you can keep the change in your solution folder if you like.
This exercise just got you started, though - in the next section, we'll be taking it to eleven.