table controls are unique as far as
styling is concerned. First, because they have the header,
body, and footerspecial properties, and
second because they have required child controls (row and
cell that themselves have required child controls.
The takeaway is
that if the style property values you defined don't seem to get applied in a
table, you're probably not targeting the right element.
header, body, and footer are special
style properties because instead of inline values, they all take one or more pointers to
style definitions that exist in the stylesheet. What you need to worry
about, then, are the actual style definitions that you assign to the
various sections of your table. It's best practice to make use of the
all wildcard and to make them recursive using the
content special property and making it equal to themselves (for
example, in line 15 below). This is a precaution against the defaults of their child
elements somehow sneaking back in and messing up your intended styling.
As you can
see, these three special properties are even more special than usual: given that the
elements that they refer to have required child elements, they can and mostly do include
content, the other, less special special style property.
Then
you go and add a style definition for both referenced named styles, and
Bob's your
uncle.
Given
that the table in your form already has both a header and a body, and
that the complete stylesheet is already linked to the root element of your form, the magic
is ready to happen. Save the updated stylesheet and publish, then open on your mobile
device.
That was a breeze and how much nicer the whole thing looks. What would be even
grander, though, is if the table somehow highlighted the rows that the user selects.
That's up next.
Applying styles conditonally
You want to apply a style if the checkbox is not selected, and you want
to apply a different one when it is. Let's first create the style
definition for the highlighting. The Rocky Jupiter color scheme has a third, reddish
color: use that for the background
color.
Right.
Now, watch closely; here's the trick: for the table's
row template, add a style property that applies this
or the other style definition depending on whether the
checkbox in the given row is selected. Given that the
style property needs a data-binding expression value,
you'll need to write a query expression that evaluates to one or the
other.
The
SQL CASE statement saves the day!
Republishing the updated solution gives you some tasty highlighting for selected rows.
Your form is looking fly. There's this thing with the Rocky Jupiter people though
that they'd like the barview controls to also match the company color
scheme on the one hand, and to be obviously different from one another on the other. Your
styling sword is all-powerful, so you can do whatever.
In addition to label and control common to all form
elements, the barview control also has bar control part,
which governs the actual bar that grows or shrinks.
bar has but two style properties: color that lets you
set its color, and height that lets you set its height. Given your
extravagant lifestyle, you'll probably want to use them both just to show off to those
Rocky Jupiter
clients.
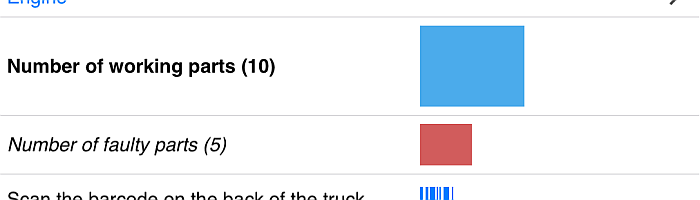
You've
got two style definitions, one for the barview that
graphs the number of operational car parts, and one for the malfunctioning one. The
stylesheet above uses the light blue and the red colors from the company branding, and
assigns the blue to the working parts, the red to the faulty ones. Feel free to change any
of that as you see fit.
All that's left to do here is to apply these styles to the target controls in the form:
...
<barview label='{"Number of working parts (" ||
                  TOSTRING((SELECT SUM(pg.partsList.yesCount)
                  FROM vehicleRegions.rows pg)) || ")"}'
...
  style='{styles.operational}'/>
<barview label='{"Number of faulty parts (" ||
                  TOSTRING((SELECT SUM(pg.partsList.noCount)
                  FROM vehicleRegions.rows pg)) || ")"}'
...
  style='{styles.malfunctioning}'/>
...
After the usual saving and publishing, you'll see that when you now mark car parts operational or faulty, the bar chart gets all sexy on you.
Zebra-striped tables
The best formatting isn't just eye candy though, but helps the user in some way. The techniques you'll pick up in this section all make the job of using the forms you apply them to easier.
Alternate row colors and varying
column widths guide the user's eyes and help make sense of tables, and when you've got a
100-row contacts list, your users need all th ehelp they can get.
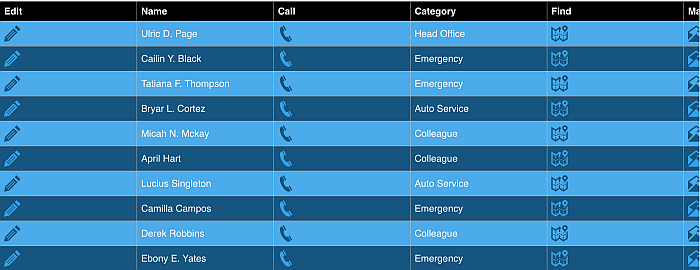
Index-based styling of table rows
Alternating row colors or 'zebra stripes' for a table can look impressive and are a
definite boost to user experience. You style even-numbered rows with a color that's
slightly different from the one you apply to odd-numbered rows, so the user can
immediately tell which row a given cell value belongs to. Because the rows in a
table control are generated dynamically, for this trick you somehow
need to keep track of whether a generated row is even- or odd-numbered. Turns out the
table control had such a dynamic counter all along, but all will be
revealed in good time. First let's take care of the style definitions for the alternating
backgrounds.
The styles above specify the dark and light blue from the Rocky Jupiter brand scheme, but you could go with any two colors you like seeing together. The second preparatory step is to produce the icons for the link controls in both of the chosen colors. You could skip this in theory, but having the same icons in every row over alternating background colors looks distracting, and completely takes away the bang you're after.
We've done the image-editing for you: grab the alternate edit, phone, map, and mail icons for your design.

Now for the beef: each table (and, of course, repeater)
control has a symbolic constant that is incremented every time a new row (or template
instance in the case of the repeater) is generated. We call it record index, and you can reference it
by prefixing the word Index with the control's record
property. In your case, the cIndex property holds the current index for
the contactsTabletable control.
From here on, it's a breeze: you apply the odd style to your
row if the index is odd, and the even one if it's
even. Do the same for the subkitbutton, linkviews, and
mailto, and you're all set for the
zebras.
... <table id='contactsTable' record='c' ...> <header> ... </header> <rowstyle='{CASE WHEN cIndex%2==0 THEN styles.even ELSE styles.odd END}'> ... <cell> <submitbutton id='edit'labelIcon='{CASE WHEN cIndex%2==0 THEN icons.edit ELSE icons.edit2 END}'.../> </cell> ... <cell> <linkviewlinkIcon='{CASE WHEN cIndex%2==0 THEN icons.phone ELSE icons.phone2 END}'.../> </cell> ... <cell> <linkviewlinkIcon='{CASE WHEN cIndex%2==0 THEN icons.map ELSE icons.map2 END}'.../> </cell> <cell> <mailtolinkIcon='{CASE WHEN cIndex%2==0 THEN icons.mail ELSE icons.mail2 END}'.../> </cell> </row> <footer> ... </footer> </table> ...
Save the style file, the form, and the new icons, publish, and open on the device. It's zebra time.
Tweaking table column width
How can a form that hangs off the screen ever be user-friendly? Even though you've got
zebra stripes now, column widths are distributed evenly without regard to the width of the
content, or the width of the viewport. You can fix this by explicitly specifying the
table control's columnWidth style property.
The other eye candy you might consider is grouping the columns with text in one bunch, and the columns that show icons in another. The 'Edit' icon needs to stay clearly distinct from the others, but the 'Call' icon could be grouped with 'Find' and 'Mail'.
Given that the icons are 40 pixels wide, you don't need to leave more than 50 pixel
widths to display them in the table. However, you'd like the column with the names to be
wide enough for even quite long names. List the widths that you want to assign to each of
the columns in a comma-separated list in columnWidth - it is recommended
that you assign relative instead of specific widths to the string-value columns, so that
the widths fit the width and orientation of whatever viewport your users are
using.
You
could go with specifying content for the icons, which would make the
columns exactly as wide as the icons they hold, but that would make the text in the
headers break.
Edit the contacts form so that the columns with the icons are grouped on
the right, save, publish with the tweaked style file, and open on your device.
Who would've thought? Those 50 pixels weren't quite enough to display the previous 10. The footer needs an overhaul to fit the new layout.
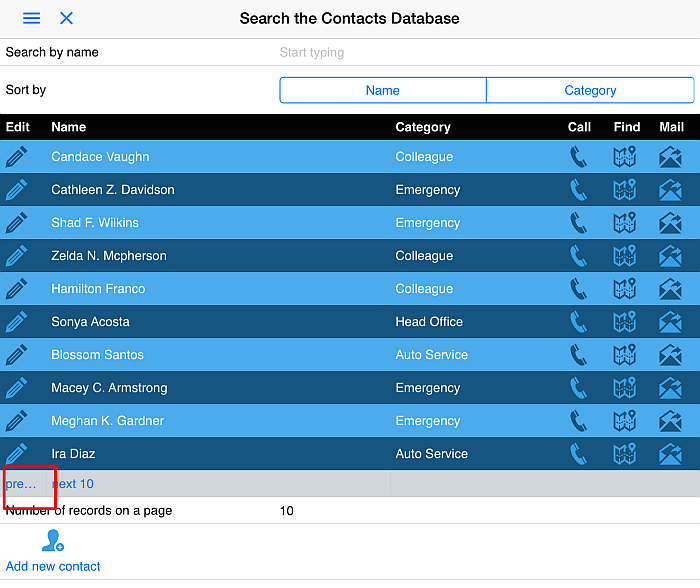
Redefining results navigation
Actually, while you're on the footer, you could set its background color to match the header, and move the Add new contact and the Number of records on a page functionality inside the footer for compactness.
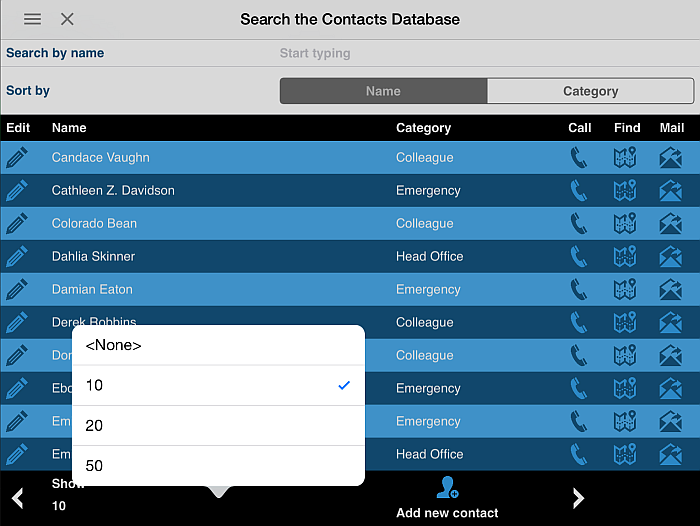
Also, the option to set the number of records displayed on a page is usually presented to
the user not as a free input text box, but a choice of two or three set page sizes. You
could implement a dropdown in the footer for the same setup.
The elephant in the room is the broken Previous 10 string. You could replace both page navigation buttons with simple arrow icons, and stick them into one of the 50-pixel columns instead. Here's the white arrow pointing left, and here's the one pointing right, ready for your design.

All set? Get rid of the text for the navigation
actionbuttons, and add a linkIcon instead. Then, add a
dropdown that displays a few page size choices as a table expression.
Don't forget to modify the pageSizelet at the top to reference your new
dropdown.
<form id='contacts'...>
  <declarations>
...
    <let id='pageSize'
      shape='scalar'
      value='{TOINT(contactsTable.pager.selectedText)}'/>
 ...
    </declarations>
...
    <table id='contactsTable' ...>
...
      <footer>
        <row>
          <cell>
            <if cond='{ page > 0}'>
              <actionbutton text=''
                linkIcon='{icons.previous}'>
                <set target='page' value='{page - 1}'/>
              </actionbutton>
            </if>
          </cell>
          <cell>
            <dropdown id='pager'
              label='Show'
              choices='{TABLE size("10"; "20"; "50")}'
              keyMap='{size}'
              textMap='{size}'
              selectedKey='{"10"}'/>
          </cell>
          <cell>
            <discardbutton id='add'
              linkIcon='{icons.add}'
              text='Add new contact'
              nextForm='{forms.editor}'/>
          </cell>
          <cell>
            <if cond='{total >(page+1)*pageSize}'>
              <actionbutton text =''
                linkIcon='{icons.next}'>
                <set target='page' value='{page + 1}'/>
              </actionbutton>
            </if>
          </cell>
        </row>
      </footer>
    </table>
</form>
As
you can see, the adddiscardbutton has also been moved into the footer. It makes so much more
sense.
One last thing: make sure that in your style file, both header and
footer are set to the Header style declaration, so
that the redefined footer also has a black background. Save, publish, and open on your
device to test as usual.
Marvellous. This form can take no more extra awesomeness. Time to tackle the last of
the working solutions you've put together for Rocky Jupiter: the driver dashboard.
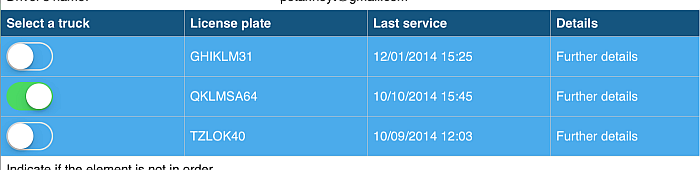
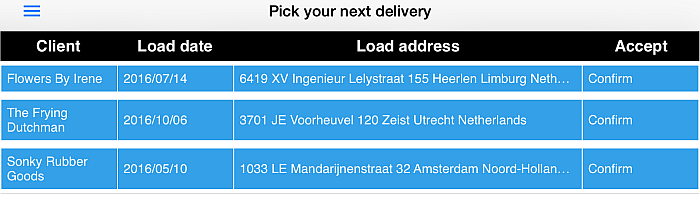
Business logic-based formatting. latest version of the dashboard formfrom earlier
What you'd like to do here is take the functionality of the dashboard form a step further purely with formatting. The idea for the dashboard form is that drivers are instantly notified of any change to the delivery tasks that are assigned to them, without having to open any form.
If this is the first time you meet the Driver Task List dashboard form, you'll appreciate the solution artifacts (reference table declaration files, input data spreadsheets, technical forms, and workflow scripts) that it needs to function.
Color-coding the delivery tasks on the dashboard by status would make the driver notification process even smoother.
Actually, the assigned table in the dashboard form already sorts the
displayed delivery tasks by status. All you need to add is some background color that gets
applied conditionally, based on the status of the
Let's go about this in reverse, and set up the dashboard form first. To make it play
along with the styles you'll define later, add a style property to your
row, with a long CASE WHEN
clause:
Note that making the applied styles match the status they're based on saves you hassle and cuts down on maintenance.
Right, time to define those styles in the style file. Given that you're dealing with a
table control, apart from the status-based styles, you'll also need a
style for the header and the body.
styles
{
    style Awesome
    {
        table
        {
            header = Header
            body = Body
            columnWidth = 1, 1, 3, 1
            borderWidth
            {
                top = 0px
                bottom = 0px
            }
        }
    }
    style Header
    {
        all
        {
            content = Header
            backgroundColor = 000000
            fontColor = ffffff
            fontSize = 1.5 em
            bold = true
            textAlign = center
        }
    }
    style Body
    {
        all
        {
            content = Body
            fontColor = ffffff
        }
        table
        {
            body = Body
        }
        row
        {
            margin
                {
                    top = 4px
                    bottom = 4px
                }
        }
    }
    style Assigned
    {
        all
        {
            content = Assigned
            borderWidth
            {
                left = 1px
                right = 1px
            }
            borderColor = ffffff
        }
        table
            {
                body = Assigned
            }
        row
        {
            backgroundColor = 52, 160, 232
        }
    }
    style Loaded
    {
        all
        {
            content = Loaded
            backgroundColor = 18, 70, 105
            fontSize = 1.6 em
            bold = true
        }
        row
        {
            backgroundColor = 18, 70, 105
        }
    }
    style Confirmed
    {
        all
        {
            content = Confirmed
            backgroundColor = 1578ba
            fontColor = ffffff
            fontSize = 1.6 em
            bold = true
        }
        row
        {
            backgroundColor = 1578ba
        }
    }
}
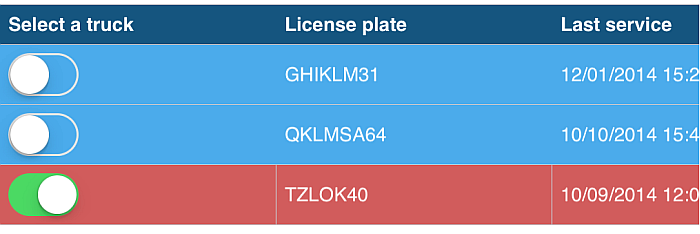
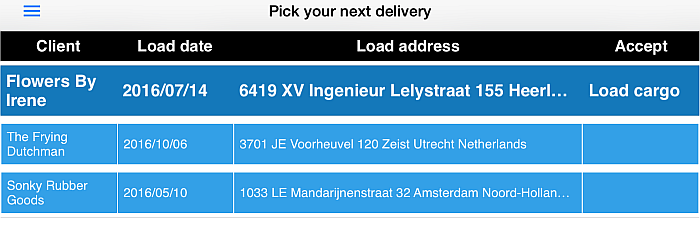
The new styles defined above make active tasks slightly larger than not-in-progress ones, and shift the background colors between those in the Rocky Jupiter colro scheme.
Save, publish, and wait for the dashboard form to sync itself on your mobile device. Confirm, load, and deliver one or two of your displayed deliveries, and see the background color of the tasks change as their status progresses.
If no delivery
tasks show up on your device, the reason might be that the assignments
reference table does not contain the user account that you're logged in with. The
hassle-free solution is to modify your username to
petar.hoyt@gmail.com on the Users tab of
the Backoffice site.
If you have followed along with the previous tutorials, you officially know and have
tried everything. This is as much as we can teach you about mobile and browser-based
workflow forms. To learn more, you'll need to actually make your own workflow solution,
and publish it to real users