Add interface elements to add or delete contacts
Editing a list of contacts certainly includes adding and deleting one or more contacts.
This is next for your contacts form.
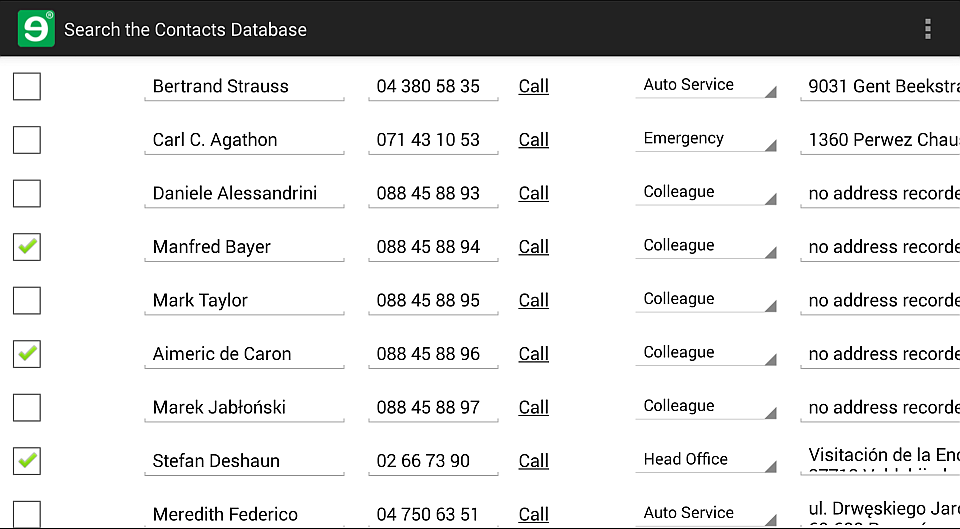
Figure 108. In the updated form, the user can mark a row for removal by selecting its Delete Contact check box
You'll use a check box to let the user mark the rows that he or she would like to remove, and a user-generated dynamic list control to let the user add one or more rows, one row at a time, to the list.
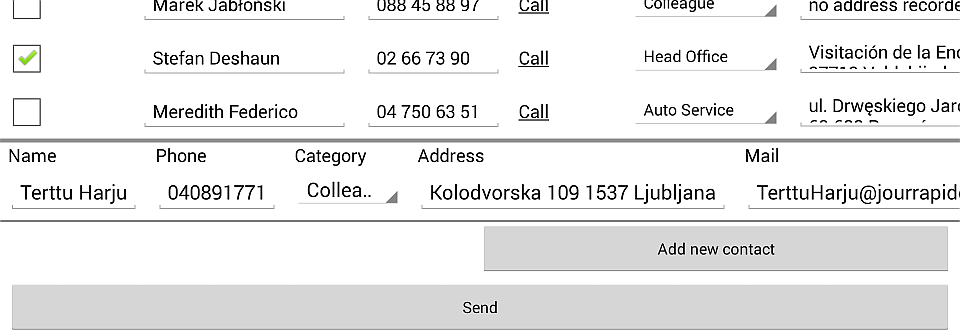
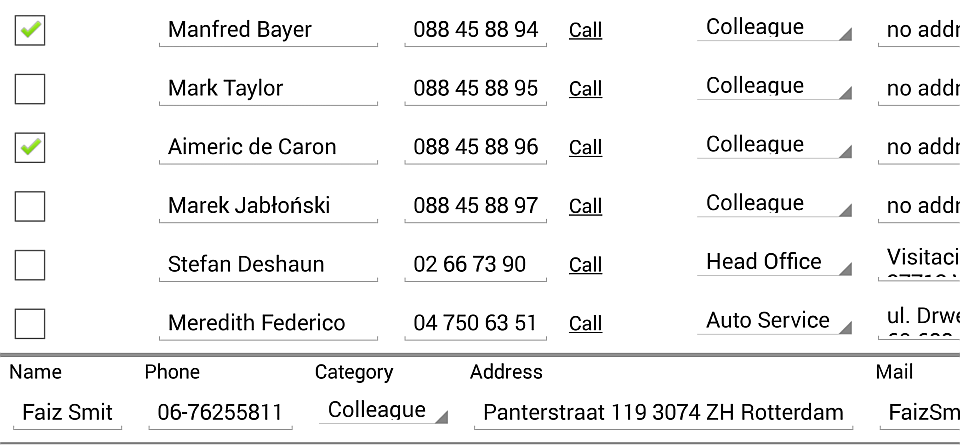
Figure 109. When the user taps the Add new contact button, a blank row with empty text boxes for column data appears
You'll of course also have to modify the workflow script to pick up on the values of these new controls. Goes without saying, right?
-
Insert a
type="checkbox" label="Delete Contact"control as the first child element of thecontactsTabledynamic list control. -
Below the dynamic list control, add a
type="panel" layout="table"control with thecount="0"attribute, so that it will not display unless the user generates it (you've done this sort of thing before).What you set up in this panel is a table with as many rows as the user taps the Add new contact button, and columns that correspond to the
contact.refemreference table declaration. The table will have blank editable controls.Inside the panel, add the same child elements that
contactsTablehas, but leave the text boxes empty (text="").Add a
RequiredValidatorto at least thenewContactNametext box, so that the user will not be able to submit the form without a name for the new contact.... <Control type="panel" name="addContact" navigation="inline" layout="table" count="0"> <Control type="textbox" name="newContactName" label="Name" text=""> <Validators> <Validator type="RequiredValidator" changeindicator="both" verifyat="change"> </Validator> </Validators> </Control> <Control type="textbox" name="newContactPhone" label="Phone" text=""/> <Control type="combobox" choice="dropdown" name="newContactCategory" label="Category" reference="SELECT 'Head Office' UNION ALL SELECT 'Colleague' UNION ALL SELECT 'Auto Service' UNION ALL SELECT 'Emergency'"/> <Control type="textbox" name="newContactAddress" label="Address" text=""/> <Control type="textbox" name="newContactMail" label="Mail" text=""/> </Control> ... -
Every new item in the reference data needs a unique identifier: the
contact.refemdeclaration demands one in the first column. You can easily make one for eachaddContactpanel that the user generates with the special reference="GUID" query operator that generates a string such asdb623b548b0e45d79ecbb7c74308fd6f. Just like incontactsTable, you should make the control an uneditablelabelcontrol, and hide it with thevisible="false"attribute. -
Finally, make the panel a functional user-generated dynamic list control by adding below it a
type="button"control with anActionschild element that targets the panel.If you took the trouble to add a reference table to populate the
columnCategorydrop-down in the previous section, bind it inside thenewContactCategorydrop-down in this new version of the form. Otherwise, just stick to hardcoding a static query. -
Save the file as
contacts.form.xml, and publish. The check boxes and the Add new contact button sure look pretty, but without a new workflow script, they're not much use.
Upgrade your workflow script to delete or add rows to the linked reference table
In your new workflow script, you'll want to check whether the user marked any rows for deletion, and delete the row from the reference table if yes.
The part of the script that updates the reference table to the values in the form doesn't need to change. (Yet.)
In a separate code block, the workflow script should make sure that the rows that the user
added and filled in will be added to the contact reference table.
-
Open contactUpdater.rfs, and start scripting.
Inside the
foreachloop, above theUpdate()call, add anif conditional statement that checks if thedeleteContactcheck box for the current row in the loop is selected, and calls the table.Delete() method on the row if yes.You need
"true"instead oftrueto check the value of the check box control, because a server-side script can only access the values in a submitted form as strings.Put the original
table.Update()call in anelsestatement to complement theif, so that your script only updates the rows that the user did not want to delete.server program contactUpdater for form contacts using reftab contact; { foreach(var row in form.root.contactsTable) {if(row.deleteContact.value == "true") db.contact.Delete({id:row.idLabel.value}); elsedb.contact.Update({id:row.idLabel.value},{ name:row.columnName.value, phone:row.columnPhone.value, category:row.columnCategory.value, address:row.columnAddress.value, mail:row.columnMail.value}); }foreach (var row in form.root.addContact) db.contact.Insert({id:row.newContactIdLabel.value, name:row.newContactName.value, phone:row.newContactPhone.value, category:row.newContactCategory.value, address:row.newContactAddress.value, mail:row.newContactMail.value});} -
Below the first
foreachloop, add another one that cycles through the rows that the user generated with theaddContactcontrol, and calls the table.Insert() method to add a row with the new column values to the reference table. -
Save the workflow script. Make sure that you overwrite the original
contactUpdaterscript, and not create a new file with the same script header data. The Mobilengine Cloud only allows one workflow script for each mobile form. Themebtwill stop with an error if you try to publish more than one script with the same form name in the header.c:\RockyJupiter>mebt run . reftab.xlsx mobilengine srv 22.0 (Release) v22.0.152.14477 Executing run (compile and deploy to server): Service url: https://tutorial.mobilengine.com/services/comex/v1/ User: petar.hoyt@gmail.com contactUpdater02.rfs: Non-unique server rfs trigger: contactsFigure 110. The
mebterror message when you publish two scripts to be triggered by the same form
-
Try out the new form and its script: open the form on your mobile device, select one or more contacts for deletion, and add a new contact, then submit the form.
Synchronize the device with the reference table, and check that you indeed had an effect on the reference table.
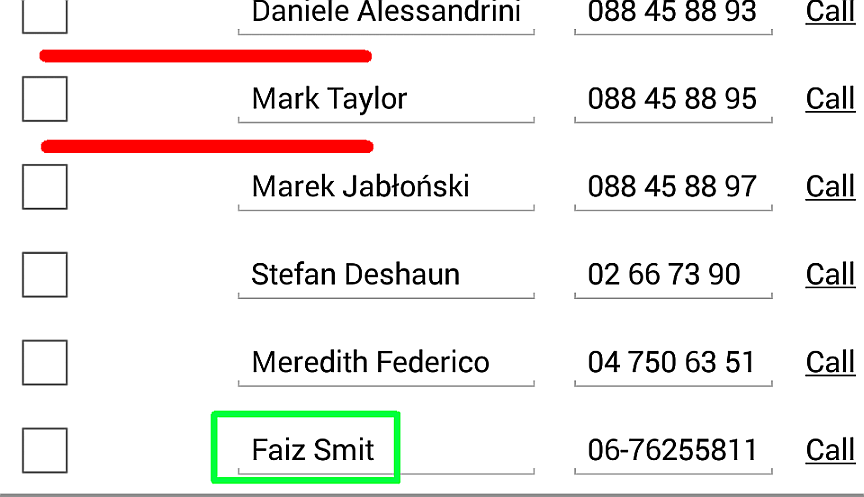
Figure 112. The same form reopened after submitting the changes: the red lines indicate where the entries that you deleted; the new entry that you added is in a green box
-
Log in to the Backoffice site and check on the Dev Console → Log screen that the workflow script was triggered and ran successfully.
-
Great job. Your script is getting better and better, but there's still room for improvement.
In its present state, contactUpdater updates the complete
contact reference table, even the rows that the user left unchanged.
This is not ideal: it generates an unnecessary load on the server, and does not let two or more users edit the same reference data. The change that arrives last overwrites every previous edit.
What you need to do is somehow make the workflow script selectively update only the rows that have changed.


