You are creating a vehicle inspection form that truck drivers can use to report problems with their trucks - so far, though, your form only lets them report that there is a problem, but no details. This needs to change.
First, you'll include a text box (for a description of the problem) and a photo control (to submit a photo about the problem) below one of the existing segmented controls.
Then, you'll make sure that the text box and the photo control only appear if the user taps the No button in the segmented control.
Open the form you have been working on so far. Study the following code sample, and
download the file to see the complete code. It adds a <Control
type="textbox"/> and a <Control type="photo"> after
each and every segment control in the vehicle inspection
form:
...
<Control
    type="label"
    name="headerLabel"
    text="I have found all the listed elements in proper condition:"
    submit="false"/>
<Control
    type="combobox"
    name="leaks"
    choice="button"
    label="Fuel/Oil leaks"
    reference="SELECT 'Yes' UNION ALL SELECT 'No'">
    <Validators>
        <Validator
            type="RequiredValidator"
            verifyat="submit"
            changeindicator="both"
            message="Please indicate if the listed part is in order."/>
    </Validators>
</Control>
<Control
    type="textbox"
    name="leakDescription"
    label="Description"/>
<Control
    type="photo"
    name="leakPhoto"
    allowmultishoot="true"
    proposedresolution="1024x768"
    proposedquality="91"/>
...
Study notes:
-
A photo control has
type="photo"; all of its attributes are optional. -
allowmultishootlets the user submit multiple photos with a single control. -
proposedresolutionsets the resolution of the photo that the built-in camera will take. The default is the native resolution of the mobile device. If you specify a specific resolution, the built-in camera will use a supported resolution that is closest to the one you set. -
proposedqualityis a device-dependent compression ratio between 0 and 100. The default value is 90.
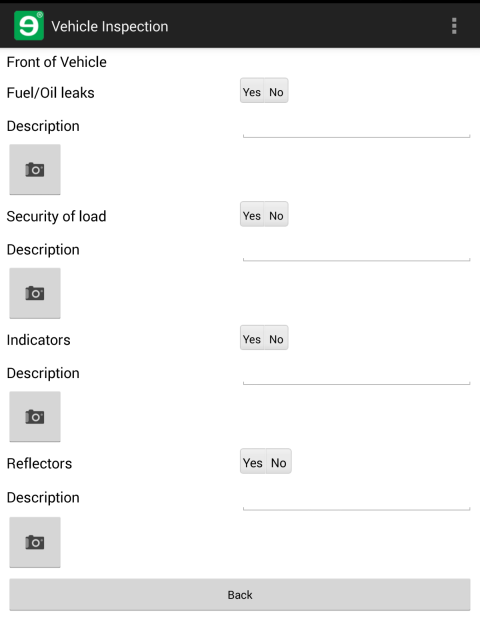
Figure 49. The Front of Vehicle segmented controls in the new, extended version of the form that you coded above
As you can see in the screenshot, the text boxes and photo controls crowd the screen of the phone with a lot of unnecessary elements - after all, a detailed problem report is only required if there is a problem. The text box and the photo control should only appear if the user taps the No option on a segment control.
You will have to use a form of data-binding to make this trick work. Data-binding is a technique that you simply must know how to use to develop complex mobile workflow solutions. Find out all about it in the next tutorial.