There isn't too much clutter in your form, true, but a neat sub-heading is always welcome to make the user's job of finding what he or she is looking for a bit easier. On the other hand, you, the developer, also deserve to have your job made a little easier: you don't want to have invalid or missing data in your database just because the user entered some nonsense, or forgot to fill in a required field.
You can clamp down on misbehaving users by specifying one or more conditions that the input in a control must meet. The conditions kick in whenever the user enters data in a control that the conditions apply to, or when the user clicks the Submit button.
Let's see how you can do this. Modify newTask.fls.xml to fit the
code
below.
<form id='newTask' menuName='New Task'
    platforms='web'
    xmlns='http://schemas.mobilengine.com/fls/v1'>
    <chapter id='clientDetails' title='Client data'>
        <textbox id='client' label='Client' lines='3' width='30 em'>
            <validation>
                <validator cond='{text != ""}' message="Required field"/>
            </validation>
        </textbox>
        <textview id='POdate'
            label='Purchase Order date:'
            text='{FORMATDTL(sysp.dtlFormOpen,(dtf yyyy "-" MM "-" dd" "HH":"mm":"ss))}'
            width='30 em'/>
    </chapter>
    <chapter id='deliveryData' title='Delivery data'>
        <dropdown id='driver'
            label='Assigned Driver:'
            choices='{SELECT u.userid, u.name FROM drivers u}'
            keyMap='{userid}'
            textMap='{name}'
            width='30 em'/>
        <dropdown id='loadType'
            label='Type of Cargo'
            choices='{SELECT c.cargo_type FROM cargoTypes c}'
            keyMap='{cargo_type}'
            textMap='{cargo_type}'
            width='30 em'>
            <validation>
                <validator cond='{selectedText is not null}' message="Required field"/>
            </validation>
        </dropdown>
        <textbox id='loadAddress' label='Load Address:' lines='5' width='30 em'>
            <validation>
                <validator cond='{text != ""}' message="Required field"/>
            </validation>
        </textbox>
        <linkview id='mapLink'
            text='Show address on map'
            url='{"https://www.google.com/maps/place/?q=" || loadAddress.text}'/>
        <datepicker id='dueDate'
            label='Delivery due:'
            dateFormat='(dtf yyyy "-" MM "-" dd)'
            width='30 em'>
            <validation>
                <validator cond='{date is not null}' message="Required field"/>
                <validator cond='{date >= sysp.dtlFormOpen}'
                    message="Due date cannot be earlier than current date."/>
        </validation>
    </datepicker>
    <textbox id='unloadAddress' label='Delivery Address:' lines='5' width='30 em'>
        <validation>
            <validator cond='{text != ""}'
                message="Required field"/>
        </validation>
    </textbox>
</chapter>
</form>
To
validate a control, nest a validation element with one or more
validator elements inside it. validators have
a required cond attribute. The expression inside it need to
evaluate to true for the form to accept the input in the parent
control. If the expression is false, the offending control will get a glaring red
border, and the text that you specify in the message attribute will
appear next to the control.
The dueDate datepicker has a second validation condition that checks
whether the date that the user entered is later than the time that the form itself
was opened.
The form evaluates validation conditions separately, and displays all the validation error messages that apply to a control.
To insert a sub-heading into your webform, wrap the controls that you want to group
under the header inside a chapter control, and specify the heading
text in its title attribute.
Save the form, publish it, and access it on the webforms website. You'll see the chapter headings right off the bat, but you'll have to try to submit the form with empty entry fields to see the error messages pop up. Set the Delivery due datepicker to any date before the current date to make the form criticize you.
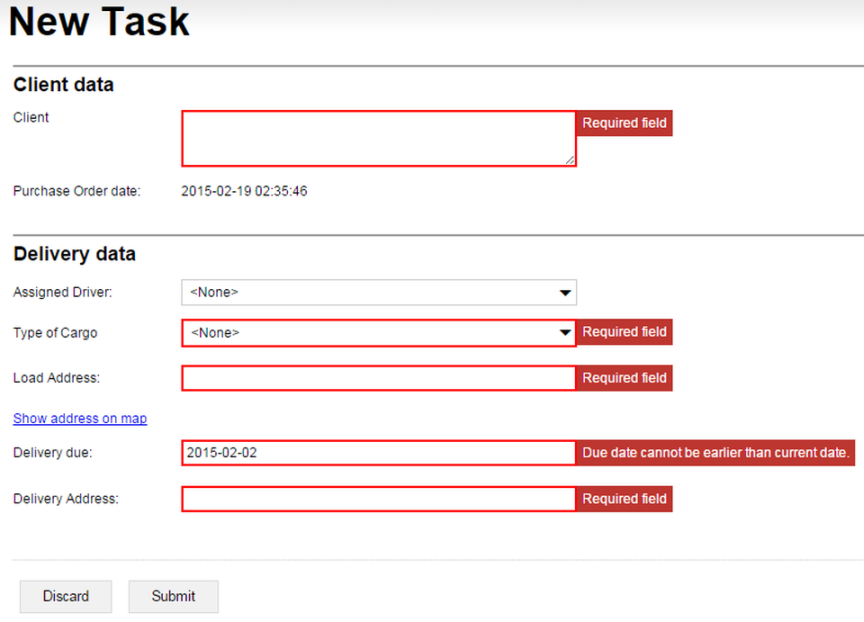
Figure 169. The New Task form with validation kicking in. Note that the controls are grouped into two chapters.
That's basically it for the form: you've got everything just the way you want
it. Sweet.
Time to make the form actually do something: scoot over to the next section, and
write a workflow script for nextTask.