-
How to change the default text of the Submit button at the bottom of forms
-
How to show, hide, and configure buttons that submit or discard the data in the form
-
How to access the button that was used to submit the form in a workflow script (
form.controlSubmit) -
How to make a workflow script run on both the mobile device and the server
Rocky Jupiter is turning out to be a regular customer: the dashboard form you made for their drivers was a hit, and now they're trusting you to deliver the Mobilengine solution that guides their drivers through their complete daily routine.
You'll be laying the foundation for the trucking company's task completion workflow: the forms that the drivers have to fill in and submit at various stages of a delivery task, and the workflow scripts that process the form submissions and that keep the list of delivery tasks up to date.
The screenshot below displays the driver's Mobilengine application screen when you're done with this part of the tutorial. The dashboard form on the right is complemented by the forms for each step of the task completion process.
What the screenshot cannot show is the engine that keeps the whole setup ticking: the workflow scripts that you'll write and associate with each of the forms on the left.
The scripts will shift the status of the delivery task that the driver is working on from Assigned through Confirmed, and Loaded all the way to Completed.
When all the details are in place, you'll make the workflow scripts run not only in the Cloud, but on the user's mobile device too, for speed and the added comfort of offline availability.
Let's look at all three forms and the workflow scripts that they trigger in the Cloud
in turn:
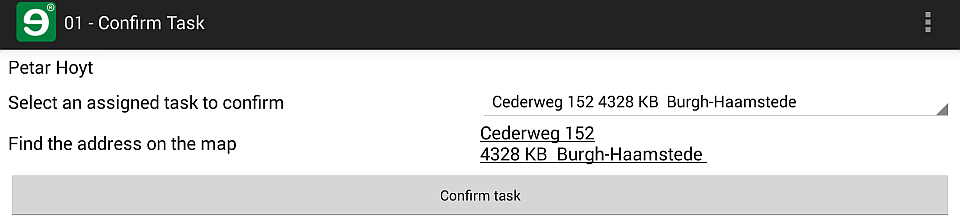
Workflow step 1: Confirm task
In the first of the workflow forms, the driver is supposed to select one of the deliveries
that is assigned to him or her, and start work on it. In the Rocky
Jupiter world, this basically means that the driver starts for the address where
the delivery cargo will be loaded on his or her truck. The workflow script that you write to
process this form when it gets to the server changes the status of the task in the
assignments reference table from Assigned to
Confirmed.
The form itself is not particularly special, except for the Submit button at the bottom: it has a custom text that is appropriate to the task. You'll see how easy it is to customize this text.
-
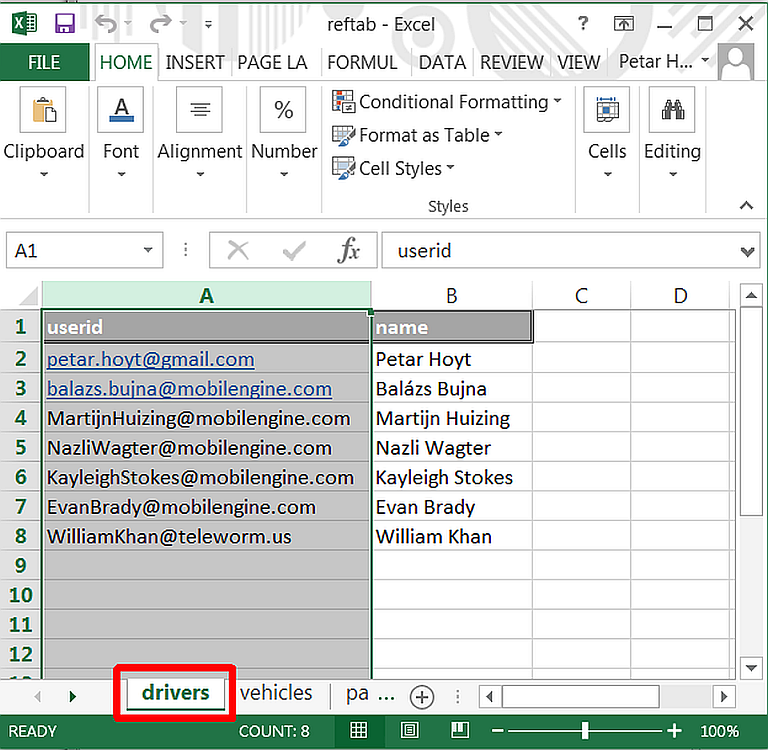
The trucking company think that the driver needs to make sure that he or she is not confirming a task in somebody else's name, so they asked you to put the driver's name on top of this step of the workflow. They want the actual name of the driver, and not his or her username to appear, so the
@usersystem parameter is not enough.No worries: you'll just have to insert a label that is data-bound to a reference table. One that has the drivers' full names in one of its columns, and their account usernames (the
@uservalue) in another, for filtering. Here's the reference table declaration:Naturally, you'll need an input data spreadsheet to populate the reference table.
The tutorials assume that you are logged in as petar.hoyt@gmail.com. The current user-based filtering won't work on the sample reference tables otherwise.
-
Now to the workflow form itself. It has three components:
<Form
  name="confirmTask"
  description="01 - Confirm Task"
  typed="true"
  send_label="Confirm task"
  dateformat='(dtf yyyy"-"MM"-"dd" "HH":"mm":"ss)'
  numberformat='{decimalSeparator:"."}'>
  <Control type="panel" name="root">
    <Control
      type="label"
      name="name"
      reference="SELECT name
                FROM Reference_drivers
                WHERE userid =@user"/>
    <Control
      type="combobox"
      name="assignedDropdown"
      label="Select an assigned task to confirm"
      choice="dropdown"
      data_type="string, string"
      reference="SELECT assignment_id, load_address
                FROM Reference_assignments
                WHERE usr =@user AND status='Assigned'"/>
    <Control
      type="label"
      name="assignment_id"
      visible="false"
      reference="REF"
      ref_arg="../assignedDropdown.key"/>
    <Control
      type="link"
      name="address"
      link_type="address"
      label="Find the address on the map"
      link_target_reference="REF"
      link_target_ref_arg="../assignedDropdown.value" />
  </Control>
</Form>
Use the
send_labelattribute in theFormelement to customize the text on the submit button.The query statements of the
nameand theassignedDropdowncontrols are quite straightforward SQLite expressions.The hidden label in lines 20-25 with the
assignment_idfield of the row that the driver selects in the drop-down is necessary for the workflow script that the form triggers on the server.When the user sends the form to the cloud, only the value of his or her selection is submitted (the
load_addressfield), but not its key (theassignment_idfield). The workflow script identifies the rows in the reference table by the id column - this is why you need theassignment_idlabel in the form.The
ref_argaddresses not the selected value of the drop-down, but its key.For convenience, the form includes a map link to the selected address: its
ref_argreferences the actual value ofassignedDropdown.Don't forget to specify the data_type of the reference table columns that you bind into the form.
-
Save the form as
confirmTask.form.xmlin your solutions folder, and open a new text file for the associated workflow script. -
The workflow script couldn't be simpler: all it does is change the
statusfield of the row that theassignment_idhidden label in theconfirmTaskform specifies.If you need a refresher on workflow scripts, have a look at the scripting tutorial.
-
Publish the solution as it is, start the Mobilengine application on your mobile device, and open the new 01 - Confirm Task form from the form list on the left of the screen.
c:\RockyJupiter>
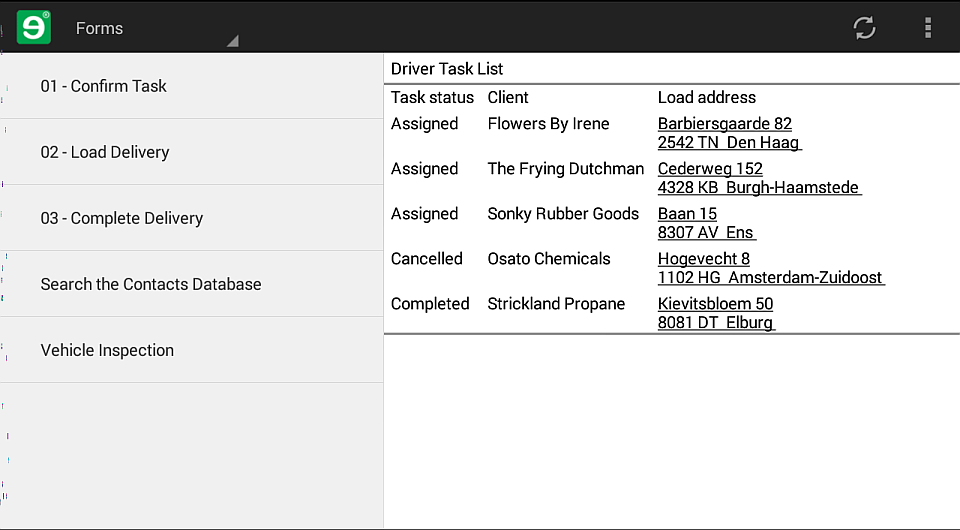
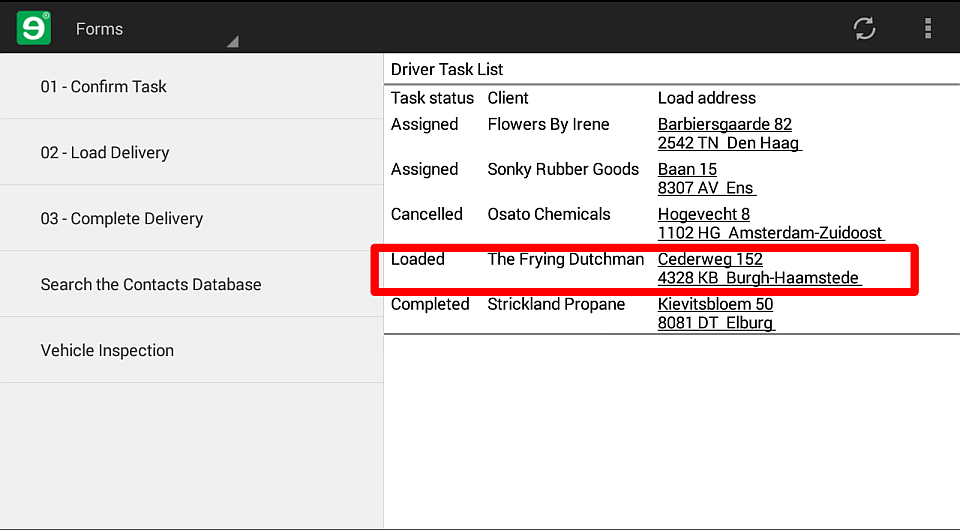
mebt run . reftab.xlsxmobilengine srv 22.0 (Release) v22.0.157.14908 Executing run (compile and deploy to server): Service url: https://tutorial.mobilengine.com/services/comex/v1/ User: petar.hoyt@gmail.com adding 'assignments.refem' adding 'confirm.rfs' adding 'confirmTask.form.xml' adding 'contact.refem' adding 'contacts.form.xml' adding 'dashboard.form.xml' adding 'unload.form.xml' adding 'load.form.xml' adding 'parts.refem' adding 'drivers.refem' adding 'vehicleInspection.form.xml' adding 'vehicles.refem' No changes for reference table 'assignments' Create reference table 'drivers' No changes for reference table 'contact' No changes for reference table 'parts' No changes for reference table 'vehicles' Reset integration settings Import form confirmTask No changes for form 'Contacts' No changes for form 'vehicleInspection' No changes for form 'taskList' No changes for form 'unload' No changes for form 'load' Import rfs confirm Import reference tables Processing table 'assignments' Rows added: 15, deleted: 15, modified: 0, empty: 0. Processing table 'contact' No changes Processing table 'parts' No changes Processing table 'drivers' Rows added: 3, deleted: 0, modified: 0, empty: 0. Processing table 'vehicles' No changes Done.Select an address, submit the form, and check that the Task status column in the dashboard form now says that the task is Confirmed.
Workflow step 2: Load the cargo or cancel the task
You now have a form to have the driver confirm a task. The next step in the process that
needs a separate form is when the driver gets to the load address of the delivery task. In
the load form, you'll need to do the following:
-
Let the driver modify the type of cargo from the type specified in the reference table, if it turns out to be different. There's a fixed set of choices for the type of cargo, so you'll have a drop-down here, with choices pulled from a dedicated reference table.
-
Let the driver add a comment and include a photo about the cargo, if necessary.
-
Include the timestamp of when the driver opened the form in the form data submission, for reference.
-
Add a signature control so the client's representative can confirm that the cargo was loaded.
-
Last but not least, you'll need to let the driver cancel the whole task, if the cargo is not ready, or incomplete, or for whatever other reason. Because of this, you'll need to include two submission buttons in the form. You'll use a new type of control for this, the
closebutton.
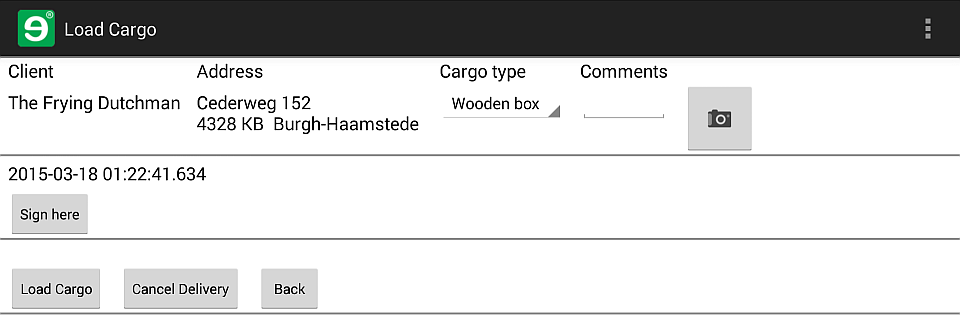
Figure 132. The 02 - Load Delivery form. The driver can update certain details of the task, and go on to the next step, or cancel the task.
-
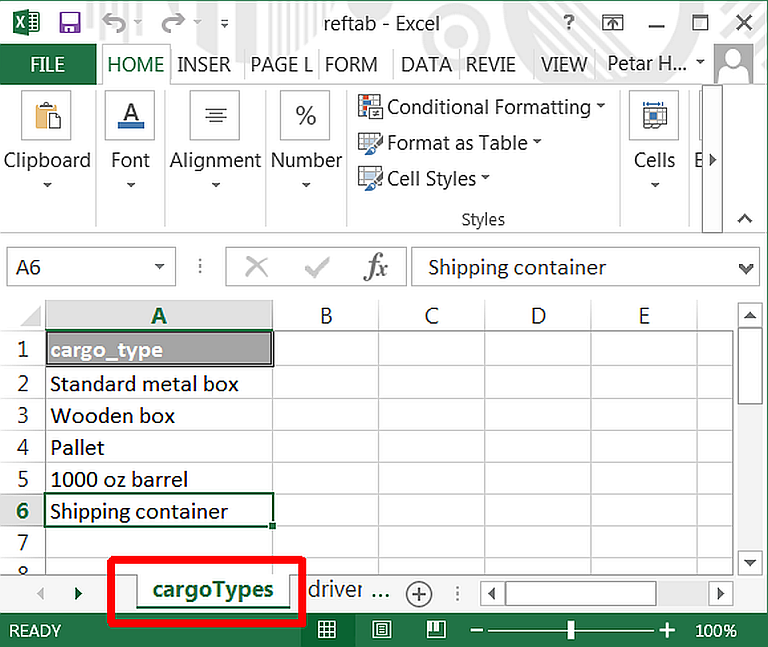
First things first: you need a reference table for the Cargo type drop-down in the form. Here's the reference table declaration file:
In the input data spreadsheet, list all the container types that Rocky Jupiter handles.
The tutorials assume that you are logged in as petar.hoyt@gmail.com. The current user-based filtering won't work on the sample reference tables otherwise.
-
The actual form will not make a veteran mobile form creator like you sweat.
<Form name="load" description="02 - Load Delivery" typed="true"
ksubmit="nobutton"dateformat='(dtf yyyy"-"MM"-"dd" "HH":"mm":"ss)' numberformat='{decimalSeparator:"."}'> <Control type="panel" name="root"> <Control type="panel" name="loadDetails" navigation="inline" layout="table" data_type="string, string, string, string, string, string, string" generator="SELECT usr, client, load_address, load_type, comments FROM Reference_assignments WHERE usr =@user AND status='Confirmed'"> <Control type="label" name="client" label="Client" reference="REF" ref_arg="PARENT.col1"/> <Control type="label" name="loadAddress" label="Address" reference="REF" ref_arg="PARENT.col2"/> <Control type="combobox" name="loadType" choice="dropdown" label="Cargo type" reference="SELECT cargo_type FROM Reference_cargoTypes" value_reference="REF" value_ref_arg="PARENT.col3"/> <Control type="textbox" name="comments" label="Comments" reference="REF" ref_arg="PARENT.col4"/> <Control type="photo" name="loadPhoto" allowmultishoot="true" proposedresolution="1024x768" proposedquality="91"/> </Control> <Control type="label" name="timestamp" reference="SELECT @dtlNow"/> <Control type="photo" meta_type="signature" name="Signature"> <Validators> <Validator type="RequiredValidator"/> </Validators> </Control> <Control name="loadCancel" type="panel" layout="table" navigation="inline"><Control type="closebutton" name="load" text="Load Cargo" action="submit_form"/> <Control type="closebutton" name="cancel" text="Cancel Delivery" action="submit_form"/> <Control type="closebutton" name="discard" text="Back" action="discard_form"/></Control> </Control> </Form>The delivery tasks that have Confirmed status and are assigned to the driver are pulled into a dynamic list control. In the template for the dynamic list, there are two label controls for the name of the client and the address, respectively.
The
loadTypedrop-down in the template is data-bound to thecargoTypesreference table, and there is a textbox control for the comments, and a photo control for photos, if needed.The interesting bit is the
ksubmit="nobutton"attribute of theFormelement that chops off the Send and the Back buttons, and theloadCancelpanel control that includes theloadandcancelclosebuttoncontrols. Theclosebuttons take the place of the usual submission button, and the first two basically do the same thing:action="submit_form". The workflow script that you'll be writing for this form in a minute will make these buttons have very different functions indeed. The third one, Back is the least interesting: it functions as a conventional discard button would. -
The challenge for the workflow script is to make the same form have two different effects on the same row in the reference table, depending on which submission button the driver used to send the form into the cloud.
server program load for form load
using reftab assignments;
{
  var confirmedTask = db.assignments.Read(
                  {usr:form.user.name, status:"Confirmed"}).Single();
  if(form.controlSubmit == form.root.loadCancel.load)
    db.assignments.Update(confirmedTask,{
      status:"Loaded",
      load_type:form.root.loadDetails.Single().loadType.value,
      comments:form.root.loadDetails.Single().comments.value});
  else
    db.assignments.Update(confirmedTask,{
      status:"Cancelled",
      comments:form.root.loadDetails.Single().comments.value});
}
The key is the
form.controlSubmitbuilt-in property, which is the address of the control that was used to submit the form to the server. Using the property, you can make the script do one thing if the driver submitted the form with theloadclosebutton (make the row'sstatusin the reference table Loaded), or something else if the form was submitted with the other closebutton (make the row'sstatusin the reference table Cancelled).The
.Single()method inserted at the end of theconfirmedTaskvariable declaration will produce an error if there is zero or more than one row with the Confirmed status assigned to the driver. This is because in the preferred workflow, a driver only works on a single delivery task at a time. -
Check your work: save all the artifacts in the
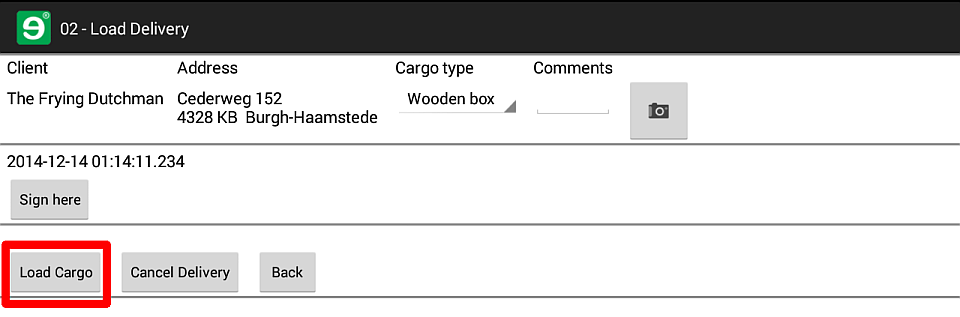
RockyJupitersolutions folder, publish, and open the Mobilengine application on your device.When you select and submit a task with the 01 - Confirm Task form, it should appear as Confirmed in the dashboard form. The same task should also appear in the 02 - Load Cargo form.
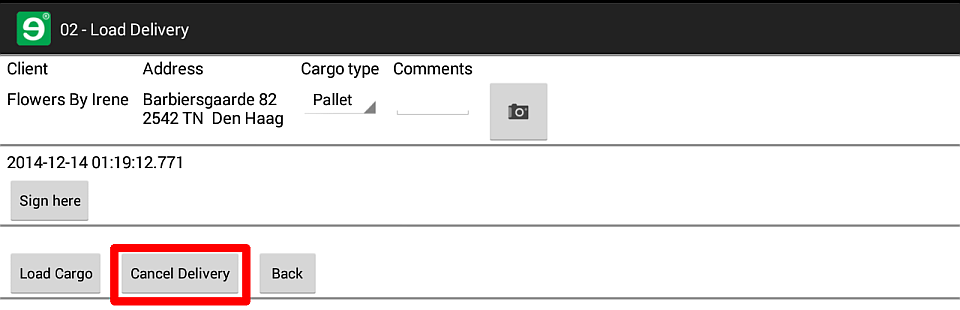
Open 02 - Load Cargo, and submit one task with the Load Cargo button, another with the Cancel button.
The dashboard form should list the first task as Loaded,

Workflow step 3: Unload the cargo and complete the task
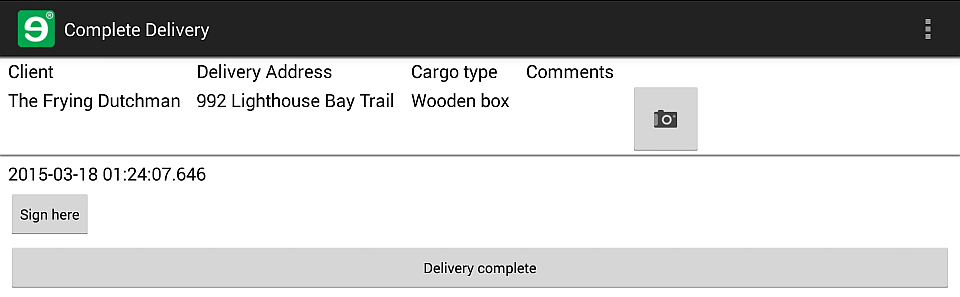
The finish line is now in sight. The 03 - Complete Delivery form, as you can see in the screenshot here, is almost exactly the same as the 02 - Load Cargo form, only simpler.
Actually, you could make a copy of the previous form, rename it
unload.form.xml, modify a few lines, and be done with it. Observe.
-
<Form
name="unload" description="03 - Complete Delivery"typed="true"send_label="Delivery complete"dateformat='(dtf yyyy"-"MM"-"dd" "HH":"mm":"ss)' numberformat='{decimalSeparator:"."}'> <Control type="panel" name="root"> <Control type="panel" name="loadDetails" navigation="inline" layout="table" data_type="string, string, string, string, string, string, string" generator="SELECT usr, client,unload_address, load_type, comments FROM Reference_assignments WHERE usr =@user ANDstatus='Loaded'"> <Control type="label" name="client" label="Client" reference="REF" ref_arg="PARENT.col1"/> <Control type="label"name="unloadAddress" label="Delivery Address"reference="REF" ref_arg="PARENT.col2"/> <Controltype="label"name="loadType" label="Cargo type"reference="REF" ref_arg="PARENT.col3"/><Controltype="label"name="comments" label="Comments" reference="REF" ref_arg="PARENT.col4"/> <Control type="photo" name="unloadPhoto" allowmultishoot="true" proposedresolution="1024x768" proposedquality="91"/> </Control> <Control type="label" name="timestamp" reference="SELECT @dtlNow"/> <Control type="photo" meta_type="signature" name="Signature"> <Validators> <Validator type="RequiredValidator"/> </Validators> </Control> </Control> </Form>First of all, change the
nameof the form. That's obvious, right?At the delivery site, the driver is not given the option to cancel the task any more, so, compared to the previous form, you lose the
ksubmitattribute, as well as all three of theclosebuttoncontrols - the usual submit button with a custom text is quite enough for this form.In the
loadDetailsdynamic list control, this form references theunload_addressinstead of theload_addresscolumn of theassignmentsreference table, obviously. For the same reason, the query statement filters forLoadedstatus rows, and the header of the data-bound address label becomesDelivery Address.By this point in the delivery process, the driver is not allowed to change the
load_typeor thecommentsfields of the task row in the reference table, so both the drop-down and the text box controls become read-only labels.The
confirmedTaskvariable inload.rfsbecomesloadedTaskto make things quite clear, and you'll need to insert theLoadedand not theConfirmedstatus tasks into it.Everything else you leave the same. Save the form, and get on with the associated workflow script.
-
The workflow script that is triggered when the driver submits the
unloadform has no surprises either.It updates the
statusof the Loaded status task assigned to the submitter of the form to Completed status in theassignmentsreference table. Nothing you haven't seen before. -
Save all the forms, reference table declarations, and workflow scripts inside the Rocky Jupiter solutions folder, publish, and check on your mobile device. Open the three workflow forms in the correct order, and move a single delivery task through the
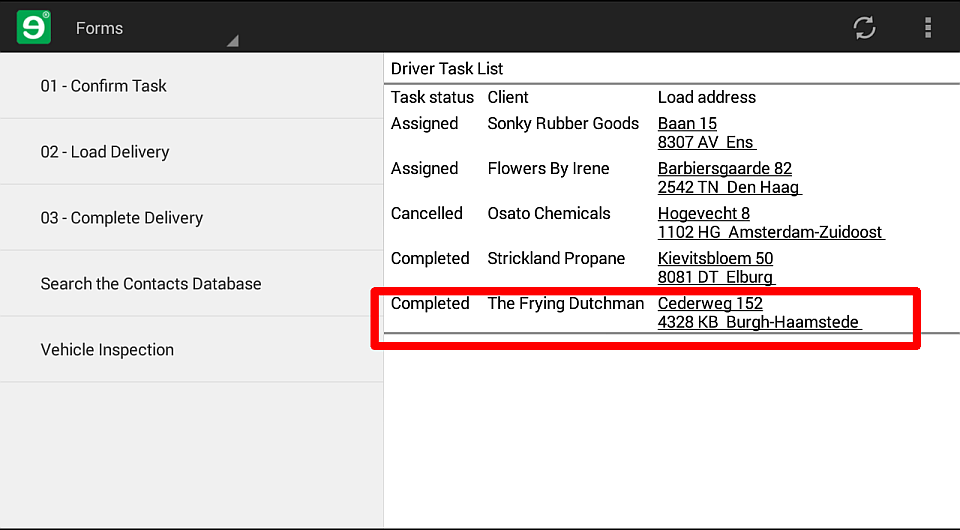
statusprogression from Assigned to Completed. You should be able to see the effects of your form submissions as processed by the server-side scripts in the dashboard form.Figure 137. After you submit the 03 - Complete Delivery form for a task, its status changes to Completed
Great job. You've just completed your first complex Mobilengine mobile workflow. Now that it's finished, it's ready for the first improvement.