The whole point of the New Task webform is to add a delivery task to the reference table that the Rocky Jupiter drivers use to get updates about their current assignments. However, the data that you submit via a form cannot modify data in the cloud without some post-processing.
Here's where workflow scripts come in; now that your form has all the elements necessary,
you can write the workflow script that will take the data that you enter and submit in the
form, and process it to update the assignments reference table.
There's something you'll have to get out of the way before you tackle the script itself:
you'll need to add a new column, and therefore modify the declaration for the
assignments reference table.
The unload_date associated with a delivery is something that the driver
enters when the cargo is unloaded. It is not the same as the Due date
in the New Task webform, which is set by the client in the purchase
order, and added to the delivery by the administrator.
For the workflow script to be able to handle this new delivery data, the
assignments reference table must contain a due_date
column. Let's add it to
assignments.refem.
The
data type for the date is obviously Date, and it is required for all
delivery tasks (NotNull="true").
Here's a link to the input data for the assignments reference
table that includes this extra column. Overwrite your existing
reftab.xlsx spreadsheet with it.
It is essential that all input data tables and reference tables conform to their declaration files. Whenever you need to modify the declaration file for a reference table, it is best practice to include a new version of the reference table that conforms to the modified declaration in the solution folder.
Fire up your text editor, and create the addTask.rfs workflow script file
below.
server program addTask for form newTask
using reftab assignments;
{
  db.assignments.Insert({assignment_id: guid.Generate().ToStringN(),
                        usr: form.deliveryData.driver.selectedKey,
                        client: form.clientDetails.client.text,
                        load_address: form.deliveryData.loadAddress.text,
                        unload_address: form.deliveryData.unloadAddress.text,
                        due_date: form.deliveryData.dueDate.date.DtlToDtdb(),
                        status: "Assigned"});
}
For a re-introduction to Mobilengine workflow scripts, refer to the very first script you coded.
The header of the script specifies the type, name, and associated webform and reference table for the workflow script.
An important difference between workflow scripts for mobile forms and webform-associated workflow scripts is that instead of
the dot-separated relative path that ends with the name of the control, and has
.value appended, you use a dot-separated relative path that ends in the
identifier of the control, and has a specific attribute of the control
appended:
The body of the script calls the Insert function on the
assignments reference table, and adds a new row to it. The columns of the
row are populated by the submitted input in the newTask form, except for
the assignment_id column field, which is generated, and the
status column field, which is a static value.
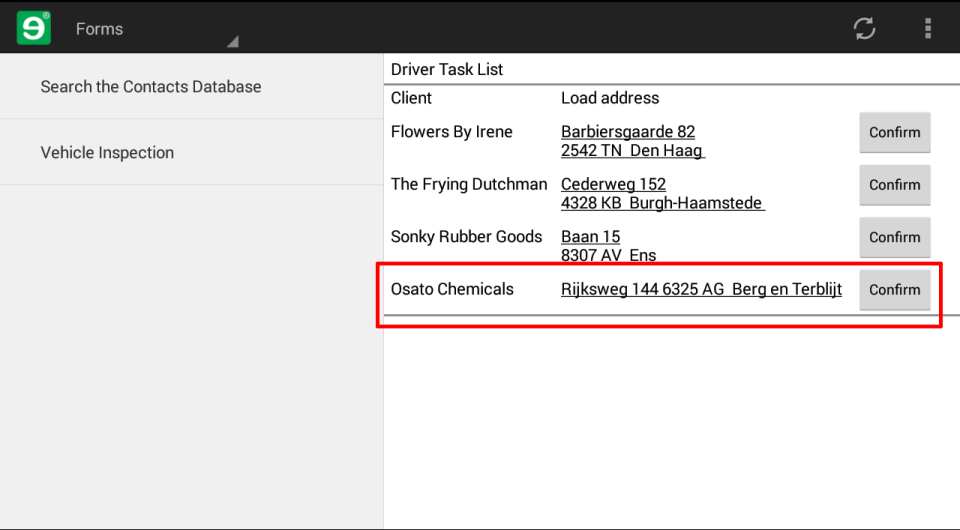
The status of the new delivery task that is inserted needs to be Assigned because the workflow that you set up to handle delivery tasks displays only Assigned-status tasks in the drivers' mobile device dashboard.
You're done! You've effectively linked the mobile workflow of the roving drivers to the desktop-based Rocky Jupiter administrators. The → → loop is closed, and self-sustaining.
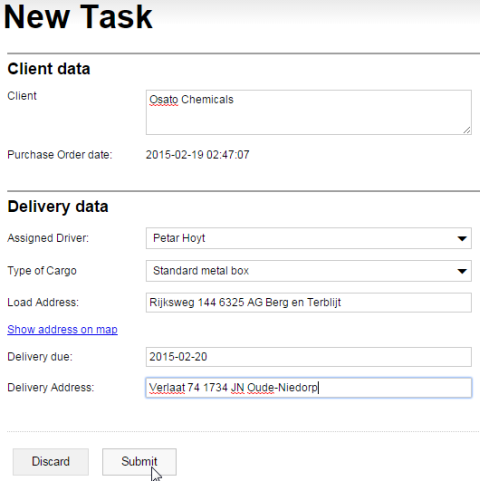
Figure 172. The final version of the webform, filled in with an order from Osato Chemicals, ready for submission
Whenever you fill in and submit a New Task webform, the
assignments reference table is updated, and the relevant driver is
notified about the new task.
You've become one hell of a form-builder. What you'll be adding to this workflow in the next section is the cherry on top.