Workflow forms are a sort of corporate communication too - they need to carry as much branding as possible, and need to fit the corporate image of the client. Mobile forms support some basic layout tweaking, and the grouping and highlighting of elements through bolding, italicizing, custom font colors, or background highlighting.
Dust down the Search the Contacts Database mobile form that you cut your scripting teeth on: you'll be using it as a case study of mobile form formatting. You won't need the workflow script that processes its form submission data - this section is pure style, no substance.
In case this is the first of these tutorials you're reading, or haven't been downloading
the solution artifacts, here's a link to the reference table declaration file and the input data spreadsheet for the contact
reference table that you need for this form.
To inject the Rocky Jupiter color scheme into the contact list, insert the highlighted
lines into your original contacts.form.xml
file.
<Form name="contacts" description="Search the Contacts Database"
  form_group="driver" typed="true" dateformat='(dtf yyyy"-"MM"-"dd" "HH":"mm":"ss)'
  numberformat='{decimalSeparator:"."}'>
  <Rgsyl>
    <Syl syln="bold"
      fBold="true"
      clrFont="#9C2C2B"/>
    <Syl syln="header"
      fBoldValue="true"
      pctFontSize="130"
      clrBg="#9C2C2B"
      clrFont="#FFFFFF"
      halign="left"/>
    <Syl syln="row"
      clrBg="#34A0E8"
      clrFont="#FFFFFF"
      duPaddingTop="2pt"/>
    <Syl syln="Address"
      clrBg="#34A0E8"
      clrFont="#FFFFFF"
      fItalicValue="true"
      halign="right"
      duPaddingTop="2pt"/>
  </Rgsyl>
  <Control type="panel" name="root" sylnChild="=bold">
    <Control name="searchbox"
      type="textbox"
      label="Search by name"
      text=""/>
    <Control name="orderBySegment"
      type="combobox"
      choice="button"
      label="Sort by"
      reference="SELECT 'Name' UNION ALL SELECT 'Category'"
    <Control name="contactsTable"
      type="panel"
      layout="table"
      navigation="inline"
      data_type="string, string, string, string, string, string"
      generator="SELECT id, name, phone, category, address, mail
                FROM Reference_contact
                WHERE name LIKE @1 || '%'
                ORDER BY case when @2 ='Name' THEN name
                WHEN @2 ='Category' THEN category END"
                ref_arg="../searchbox,../orderBySegment"
                sylnRow="=row"
                sylnCrown="=header">
...
      <Control name="columnAddress"
        type="textbox"
        label="Address"
        reference="SELECT @1"
        ref_arg="PARENT.col4"
        sylnCrown="=Address"/>
...
Formatting
in Mobilengine mobile forms relies on Syl elements grouped as child
elements of a Rgsyl parent.
The color definitions in Syl controls use hex color codes. Here's a handy reference if you're new to the concept.
These work much like the formatting rulesets defined in internal CSS stylesheets, with two basic differences:
-
the
Sylelements themselves are free-floating, and not associated with any control directly - you apply a rule to a control or group of controls by referencing theSylin an attribute of the control -
the style definitions of
Syls do not add up - even if you apply more than oneSylto a control, one of them will take precedence and completely override the other
The key idea is that once you declare a Syl, you can reference it in a
control using either the sylnCrown, sylnChild, or
sylnRow attributes. Until the definitive guide on formatting is made
available, these are the rules of thumb to remember:
-
You have to put a query statement inside a formatting attribute that evaluates to the string-value name (
sylnattribute) of theSylthat you want to reference.The simplest way to do this is to prefix the
sylnyou want with the=operator, specific to the mobile form query language, that always converts its result to a string. All the references toSyls you make in the sample code above use this method.If you're need more complex query statements, you'll also need parameters and
sylnargRow,sylnargChild, andsylnargCrownattributes. You'll learn all about these later. -
sylnChildformatting attributes refer to the child elements of the control that you declare them in.For example, in line 24 in the code above, you apply the
syln="bold"style to every child element of the root panel. This is the easiest way to set up a default style for the whole form, since every control is the child element of the root panel. -
In case of dynamic list controls, use the
sylnRowattribute instead ofsylnChild- see line 45 above. -
If there is a
sylnCrownattribute declared on the control itself, it takes precedence over every other formatting attribute that applies to the control. (In case of a dynamic list control,sylnCrownapplies the style to the header.) Just like with inline CSS, the style declared on the control itself takes precedence over cascading styles.See line 53 in the code above, where the
columnAddresschild of thecontactsTabledynamic list control overrides thesylnRow="row1"style that it inherited from thecontactsTableparent with thesylnCrown="Address"style.
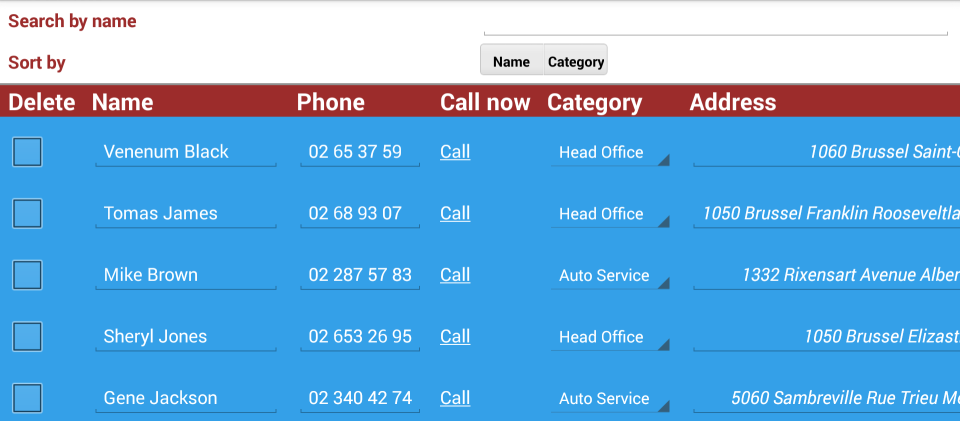
Save and publish the new, jazzed-up version of the form. This red and blue go together like coffee and cream, don't they?
The rows of the list have been given some breathing room with a bit of top padding.
Notice that the Address column of the table has right-aligned and italic text, unlike the rest of the generated table.
You can play around with the formatting a bit before you move on to some more complex
Syls: change the color, align the Call phone link
(but not the other columns!) to the center of the column, make the gap between the
Sort by segmented control and the contacts list wider - whatever
makes you and your expected users happy.
When you think you've flexed your styling muscles enough, there's some even sexier stuff waiting for you in the next section.