Let's assume that Mira Jansen is the name of the fictitious employee who's responsible for deploying and managing your mobile workflow solution for other fictitious employees of our test company, Rocky Jupiter Transport.
You have given her the URL to the Rocky Jupiter Production Cloud that you requested for your client from Mobilengine. Mira has signed up for a developer account, and so has access to the Rocky Jupiter Backoffice website, where she can manage the workflow solution that you created for Rocky Jupiter.
When her account's set up on the Backoffice site, she is ready to recieve the compiled solution. To turn the compiled solution into a functional workflow solution, she needs to
This section describes how to make the forms that you have created actually arrive on the mobile devices of their intended users, and start making their lives easier.
The samples in this tutorial will use the
rockyjupiter.mobilengine.com Production Cloud URL. This is a made-up
demonstration URL: you will need to ask Mobilengine for a separate Production Cloud URL to
host the published solutions of each of your actual client companies.
Creating user accounts on the Production Cloud server
You have your test users set up on the Developer Cloud Backoffice site for yourself and for the User A - User B scenario to test your workflow script. It's the system engineer's job to make sure that there is an account on the Production Cloud for every real-life user who will be using the forms that you developed.
The Production Cloud Backoffice site works just like the Development Cloud one, you can add all the necessary user accounts you need on the Users tab using the New user link. However, with the hundreds, or even with the few dozen user accounts in a corporate environment, this can get very tedious very fast.
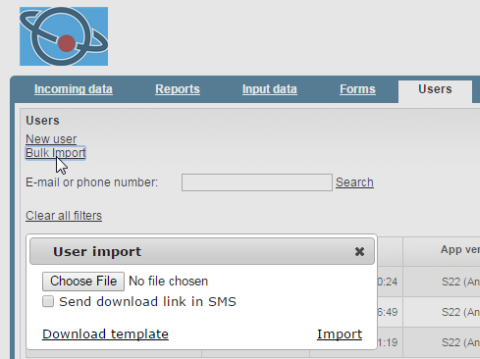
The Mobilengine SDK offers a handy option for setting up lots of mobile form user accounts in a single step. An administrator-level Backoffice user can access the Bulk import option on the Users tab. The User import dialog that pops up when she clicks the Bulk import option, Mira Jansen can first download the Excel template for the new user accounts, and then import the filled-in template file when she has added all the users she needs.
Figure 145. The Users → Bulk import feature lets administrators and devs download the user accounts template and upload the details of their mobile workflow users
The template spreadsheet behind the Download template link has
9 columns, of which 4 are required for mobile users. The column names are mostly
self-descriptive, but you'll find everything there is to know about the user import template
in the reference library.
Select the Send download link in SMS option to send the new users, via text message, a download link to the .apk file for their Android app, or the direct link to the Apple Store for iOS users .
Keep in mind that the bulk import of hundreds of new users can generate a hefty text message traffic, not to mention the massive server traffic when the new users all start downloading the client app at the same time.
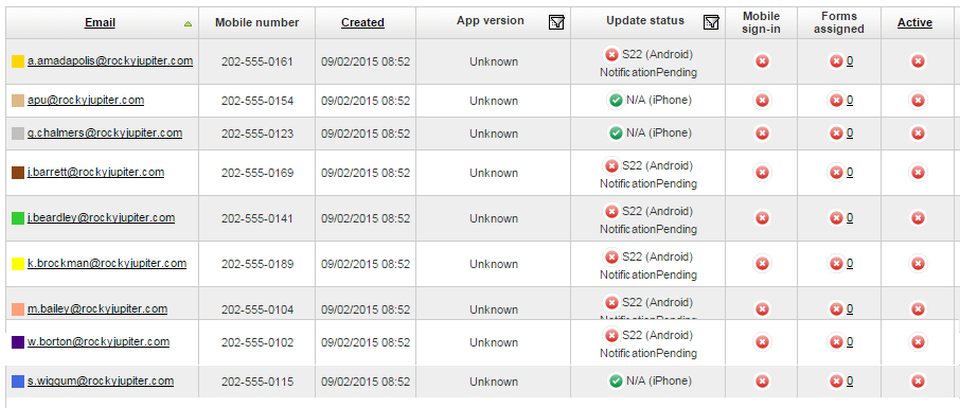
Assuming that Mira needs to set up accounts for the 9 users included in this user import spreadsheet, this is what the Users tab of her Backoffice site will look like after she imports:
As you can see, virtually all the columns in the user list are empty, because these
users are brand spanking new: none of them has any forms assigned to them (remember, there
are no forms to assign yet), and none of them has signed in to the Mobilengine mobile client
app.
The Rocky Jupiter Backoffice is now ready for a workflow solution.
Adding live reference data to a compiled solution
You can use the service URL to the Developer Cloud to follow along with the tutorial without a valid Production Cloud URL. The commands discussed below will work just fine on the Developer Cloud, but your solution will not be any more 'live' than it was before.
When she receives the compiled solution (the .mes file from the previous section) from you, the
system engineer needs to add the actual real-life reference data that the
solution will work with. This is probably some sensitive company-specific data that she
doesn't want an outside developer to have access to. She has to do this herself, using the
mebt tool and the package command.
Make sure that you give the client the download link to the mebt tool
and the environment setup instructions
along with the compiled solution.
To bundle the reference data up with the RockyJupiter.mes file, Mira
Jansen needs to run the packagemebt command on it from the command line, after she has navigated to the
directory where she saved the compiled Rocky Jupiter solution.
The template for the package command that she needs to use after setting
up the mebt is mebt package mes-file [xlsx-file].
The client's system engineer will use the mebt only when a new
(or updated) solution needs to be
published, so she does not need to have her instance-specific data added to the environment
variables. This means that she'll need to enter the URL, her username and the code that her
company has been assigned in the SDK every time she uses the publishmebt command.
The Excel spreadsheet with worksheets that correspond to all the necessary reference tables for the solution is optional, since not every workflow solution will use reference data, and sometimes the forms in a solution change and need re-publishing while the reference data stays the same.
c:\RockyJupiter>mebt package RockyJupiter.mes database.xlsx
mobilengine srv 22.0 (Release) v22.0.157.14908
Executing package (build dpkg package from a mes and an optional xlsx with reference data):
Done. The output of the command is a solution deployment package with the .dpkg
extension, ready for publishing to the Production Cloud.
Publishing the packaged solution to the Production Cloud
The standard way to publish a packaged solution to the Production Cloud is to use the publish command. The template for the command is mebt publish <options> dpkgFile, where the <options> are
-
the password to the admin user account prefixed by
-pWarning: the password will not be encrypted as you type it into the command line. Do not use this option; enter it when the
mebtprompts you for the password. See the screenshot below.
.
When you created the forms, you used the runmebt command to publish your forms to the Developer Cloud. This command is
a one-stop shop for publishing to the cloud, since it's compile, package, and publish all in
one.
It will work on the Production Cloud too, but it isn't recommended, because not only does it publish the solution artifacts in the specified folder, but it also automatically assigns them to all of the users currently set up on the Backoffice site. It is highly unlikely that each and every registered user of the Mobilengine app needs to have all of the forms of a published solution on their mobile device - in the present case, Vehicle Inspection and Driver Task List should be deployed only to the truck driver employees.
The other disadvantage of the run command is that there is no way to do a test run before actually publishing the solution to the live Production Cloud.
publish has a --preview option that is a dry run of a
real publish process. If it is included in the publish command, the
mebt lists every step that it would perform but does not in fact make any
changes. The system engineer is able to review all the files that would be modified,
created, or deleted as part of the real publishing process and notice if anything's fishy
before committing to the live server.
c:\RockyJupiter>mebt publish -s:https://rockyjupiter.mobilengine.com -u:mirajansen@rockyjupiter.com --preview RockyJupiter.dpkgmobilengine srv 22.0 (Release) v22.0.157.14908 Executing publish (upload a dpkg to the server): Service url: https://rockyjupiter.mobilengine.com User: mirajansen@rockyjupiter.com Password:**********Create reference table 'assignments' Create reference table 'cargoTypes' Create reference table 'contact' Create reference table 'parts' Create reference table 'vehicles' Reset integration settings Import form contacts Import form workflowDashboard Import form load Import form unload Import form vehicleInspection Import rfs confirm Import rfs load Import rfs unload Import reference tables Done.
As you can see, Mira Jansen did not include her password to the Production Cloud in the
mebt command, but waited for the password prompt, so that when she typed
the password, it would be replaced by asterisks. This is the recommended procedure.
Great. Nothing is missing, the solution can be published. The very same command, with the
--preview option deleted, this time, is all that the system engineer
needs to call.
c:\RockyJupiter>mebt publish -s https://rockyjupiter.mobilengine.com -u mirajansen@rockyjupiter.com RockyJupiter.dpkgmobilengine srv 22.0 (Release) v22.0.157.14908 Executing publish (upload a dpkg to the server): Service url: https://rockyjupiter.mobilengine.com User: mirajansen@rockyjupiter.com Password:**********Create reference table 'assignments' Create reference table 'cargoTypes' Create reference table 'contact' Create reference table 'parts' Create reference table 'vehicles' Reset integration settings Import form contacts Import form taskList Import form load Import form unload Import form vehicleInspection Import rfs confirm Import rfs load Import rfs unload Import reference tables Processing table 'assignments' Rows added: 25, deleted: 0, modified: 0, empty: 0. Processing table 'cargoTypes' Rows added: 5, deleted: 0, modified: 0, empty: 0. Processing table 'contact' Rows added: 15, deleted: 0, modified: 0, empty: 0. Processing table 'parts' Rows added: 22, deleted: 0, modified: 0, empty: 0. Processing table 'vehicles' Rows added: 6, deleted: 0, modified: 0, empty: 0. Done.
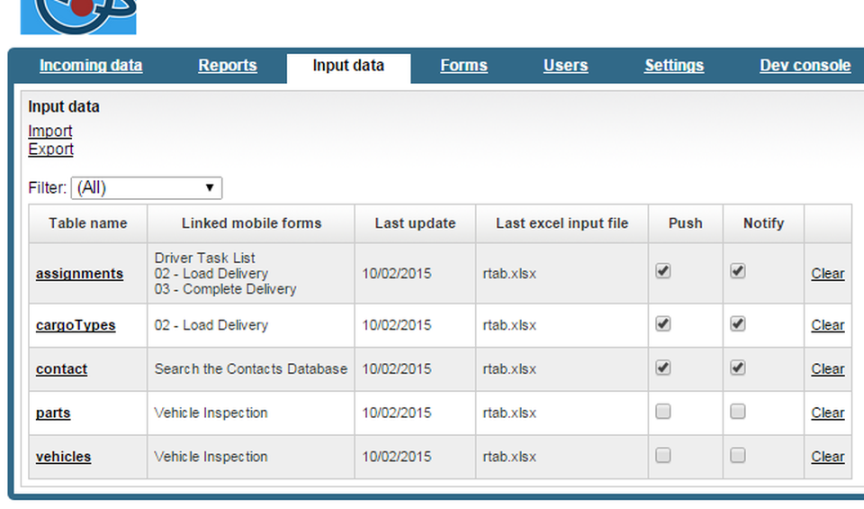
Don't take the mebt's word for it: if the admin now check the
Input data or the Forms tab of the Backoffice,
the reference tables and the forms for the solution will all be right there in the
Cloud.
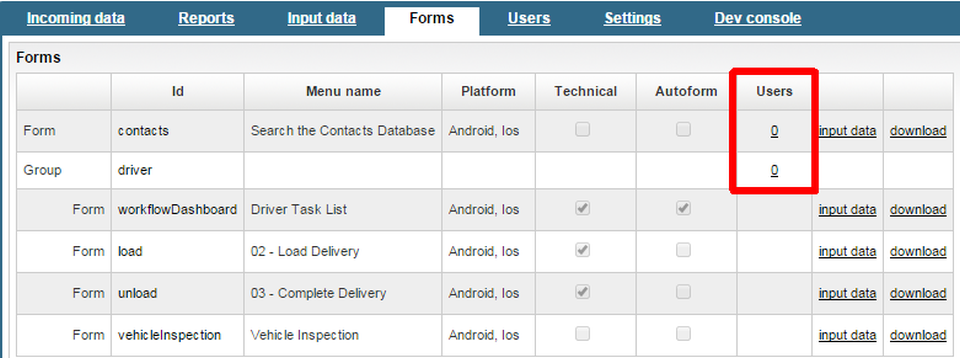
The forms are also sitting pretty on the Forms tab, but alas,
not a single user account is using any of them.
Notice how the
Users fields for the forms that belong in the
driver group is disabled; the Users field of the
Group row affects the group as a whole.
Deploying the forms to one or more users is, as mentioned earlier, not part of the publish command. The system engineer needs to deploy the forms to the users that need them separately.
'What about the workflow scripts?', you might ask. 'Don't you need to deploy them, or activate them, or something?'. Nope, they can manage on their own; the scripts stay glued to the forms that you associated them with in their headers, and they are all safely in the cloud (on the Dev console → Rfs screen).
Deploying the published solution to users
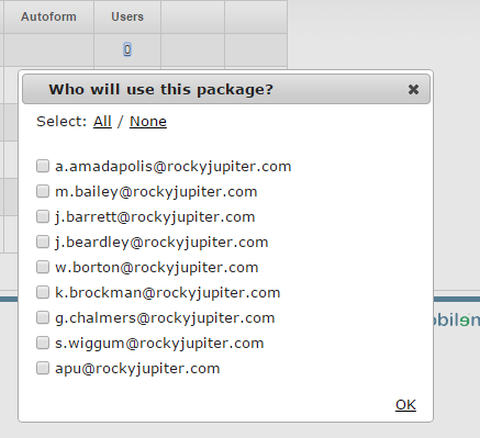
Tell Mira Jansen that all she needs to do at this point is click the number in the
Users column on the Forms tab, and select the
users that need the forms grouped into the driver form group. When she
clicks OK in the Who will use this package?
dialog, the forms in the group will be downloaded to the selected users' devices at the
earliest opportunity.
The Enable push notification option needs to be selected on the Backoffice site's Settings → Mobile synchronization screen for the automatic form deployment described above to work.
Figure 150. Click the number listed in the Users column on the Forms tab to start deploying the forms to users
To recap, here's what the system engineer needs to do to get a Mobilengine
workflow solution up and running:

