What you'll be learning about:
You've set up the integration messages to carry the data across the integration
solution all right. Just like you did with the inbound solution, now's the time to set up and configure an integration
endpoint. Since there's a URL involved, this is a bit different than its inbound
counterpart. When the outbound endpoint is in place to expose the statusUpdate
dacses, you're ready to set up the web service that receives them at the other
end.
Getting a WDX-compliant web service up and running is a three-step process:
-
Download the WSDL web service contract that the
mebtgenerates based on the published workflow solution. -
Use a dedicated tool to generate the web service contract code, the basic shell of your web service-to-be (a.k.a contract-first web service creation).
-
Add some C# code to implement the operations declared by the interface in the contract code. The implementation described here is a very low-key proof of concept, and so all the web service will do is write the incoming
dacses to the console at the receiving end. Once you hand over the integration solution, the Rocky Jupiter devs can tweak the implementation to fit their business logic.
As a Mobilengine solution developer, your job ends when you implement a WDX-compliant web
service that listens for integration messages from the Mobilengine Cloud. However, you'll
need to test whether the dacses reach the web service, and whether you
didn't mess up the web service contract code. Your real-life clients will probably host the
web service that you deliver themselves, but the easiest way for you to test the web service
is self-hosting.
The code in this tutorial presents a functional self-hosted integration, and you can read up on how to do this for yourself, but your mileage may vary. When in doubt, consult your network administrator.
Set up and configure an outbound endpoint
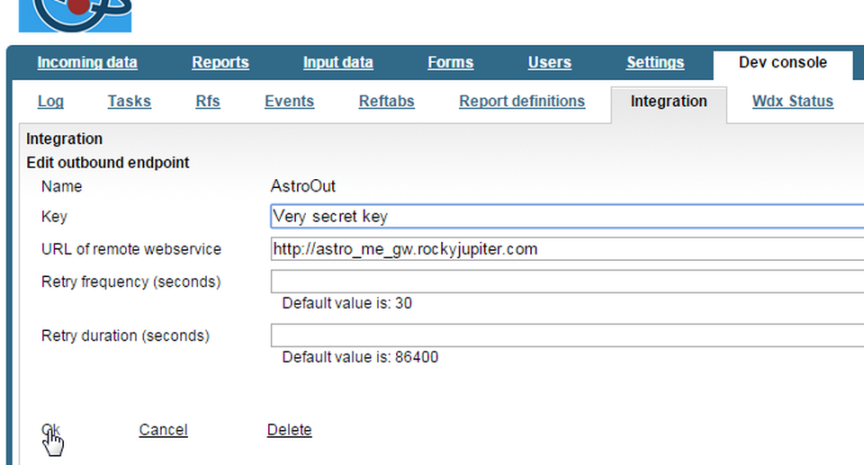
An endpoint is basically a network address where the cloud can access or be accessed by the Web Data Exchange-protocol web service that makes Mobilengine integration happen. Creating an endpoint is therefore a cloud operation on the Backoffice site, available to you on the Dev console → Integration screen. Choose the Add outbound endpoint command because right now you want to send integration messages.
Figure 186. Set up the AstroOut integration endpoint on the Backoffice
site, on the Dev console → Integration → Add outbound endpoint screen
Enter the name of the endpoint, and the URL of the web service that the endpoint is
going to communicate with.
Do not use the URL in the screenshot. Make sure that you enter a URL that the Mobilengine Cloud will have access to.
Put something you can remember into the Key field as
well. All dacs-es have a <key> element, which you can
use to protect against unauthenticated integration messages going through the wire. You can
set up the web service on the other end of the integration wire to only accept messages with the key that you set up on this screen, to enforce data security.
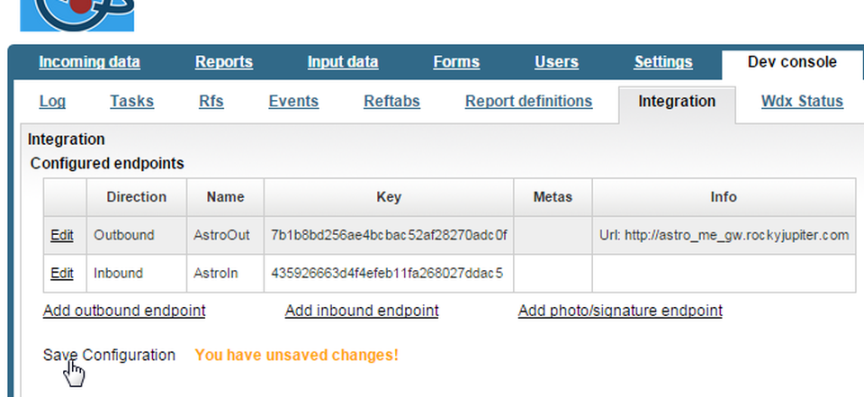
Click OK, and then Save Configuration on the next screen, to store the endpoint details.
Endpoints on the Mobilengine Cloud need to be configured to work. The tiny little
intconf.xml file gives the endpoint a name, specifies whether it is
inbound (for messages coming from the client IT system) or outbound (for messages going
towards the client IT system), and lists the names (schema properties) of
all the dacsem schemas that will be sent through the
endpoint.
Make
sure that you use the exact xmlns XML namespace inserted above, and refer
to the intconf reference
to make sure you get your endpoint-mapping right.
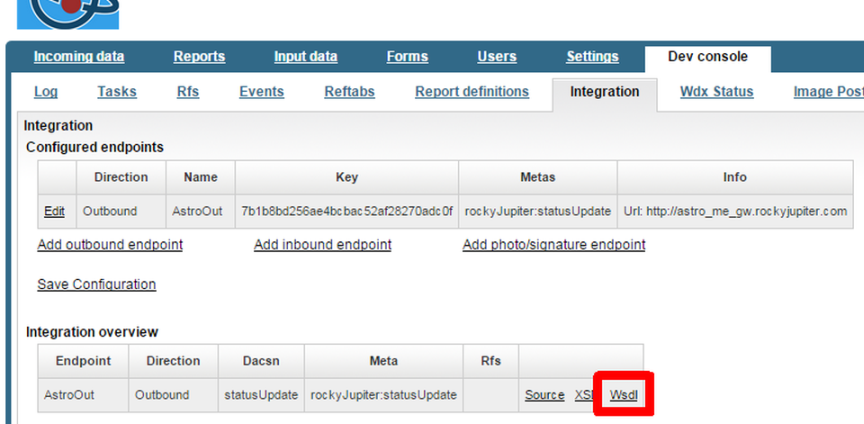
You're all set to publish the solution. When you're done, the Dev console → Integration screen on the Backoffice will duly list the configured endpoint, the name and description of the integration messages it handles, and a link to a custom WSDL file.
Figure 188. When you publish an integration-ready workflow solution, the mebt
generates a WSDL file for it
All the preparations for the integration solution were leading up to this WSDL file. Without it, you couldn't go to work on the web service that receives and processes the status update integration messages.
Generate the inbound interface for the web service
You'll need an IDE for this part of the project, and since you're coding in C# within the .NET Framework, Microsoft Visual Studio seems the obvious choice. Download and install the environment if you don't have it yet.
Once you've set up one or more integration endpoints and published a solution including an
intconf.xml file that references the endpoints, the mebt
generates a custom WSDL service contract for you. You can then use the Svcutil.exe tool to generate the web service contract code from
the WSDL file.
-
Open Visual Studio, and add a new Windows C# project. Pick Console Application as its type, and name it
RockyJupiter.Mobilengine.Service. The web service you're setting up here is only a demo: it will only ever access the command line at the receiving end, and you'll be starting and stopping it manually, so you don't need anything fancier than a console application. Set the target framework of the project to .NET Framework 4.5. -
Add references to the System.ServiceModel and System.Runtime.Serialization assemblies to make them available to the project.
-
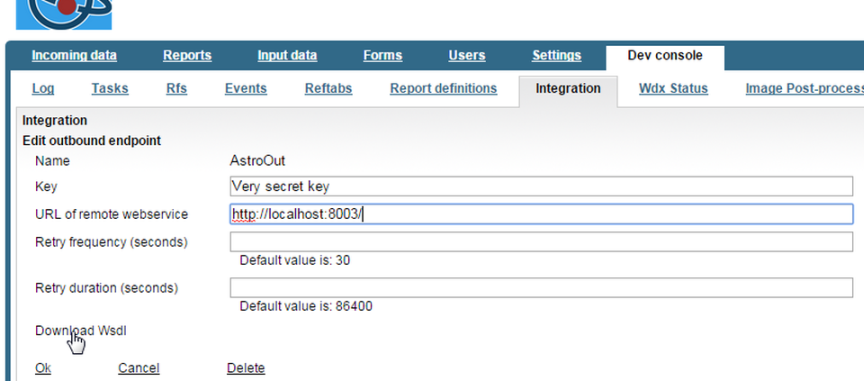
Download the WSDL generated for you: On the Backoffice site, go to Dev console → Integration, click Edit next to the endpoint that you want to connect to the outside company, and click Download Wsdl. Save the
AstroOut_rockyJupiter_statusUpdate.wsdl(and all the other files you'll create in this tutorial) in a separateRockyJupiter.Mobilengine.Serviceproject folder, as it might come in handy later.Figure 189. When your endpoint is set up and configured, the WSDL service contract will be made available on the Backoffice site
-
Start
Svcutil.exeand enter the following command to generate the web service contract code from the WSDL.c:\Projects\RockyJupiter.Mobilengine\Service>
svcutil AstroOut_rockyJupiter_statusUpdate.wsdl /sc /UseSerializerForFaults /n:*,RockyJupiter.Mobilengine.ServiceMicrosoft (R) Service Model Metadata Tool [Microsoft (R) Windows (R) Communication Foundation, Version 4.0.30319.33440] Copyright (c) Microsoft Corporation. All rights reserved. Generating files... c:\Projects\RockyJupiter.Mobilengine\Service\Wdx.csThe
/scoption specifies that a service contract is all you need; you'll add a client class and configuration manually. The/UseSerializerForFaultsoption specifies that the XmlSerializer will read and writes faults if any occur, and so theEnqueueDacsFailSOAP faults will have verifiable properties./nspecifies namespace mapping.Add the generated
Wdx.csservice contract to the project, and save the project. (The zipped project files include theWdx.cstoo.)
Implement the service contract
Add a new class to the Visual Studio project, name it WdxService,
and make it implement the IWdx service interface that the svcutil.exe tool
generated for you.
Download the zipped project files
using System;
using System.ServiceModel;

namespace RockyJupiter.Mobilengine.Service
{
    //Implement the service interface
    class WdxService: IWdx
    {
        //Make the web service aware of the security key
        private static string key = "Very secret key";

        public void EnqueueDacs(Dacs dacs)
        {
            //Return EnqueDacsFail on key mismatch
            //by throwing the appropriate FaultException
            if (dacs.Key != key)
            {
                Console.WriteLine("Authentication failed for key {0}", dacs.Key);
                throw new FaultException<EnqueueDacsFail>(new EnqueueDacsFail
                { dacsid = dacs.dacsid, Message = "Dacs authentication failed" });
            }

            //Write the contents of the incoming message to the console
            Console.WriteLine("Processing dacs {0}:", dacs.dacsid);
            var statusUpdate = dacs.Content.Item;
            Console.WriteLine(
                "At {0} driver {1} changed the status of assignment {2} from {3} to {4}.",
                statusUpdate.changedAt,
                statusUpdate.driver.Value,
                statusUpdate.assignmentId,
                statusUpdate.oldStatus,
                statusUpdate.newStatus);
        }
    }
}
Add the code to customize the EnqueueDacs method. This is the meat of your
whole integration project; when the solution is functional, you'll only need to change this
code to change what happens with the integrated data once it's got to the other side.
Implement the API key-based authentication so that incoming messages that don't match the key you set up on the Mobilengine end of the wire won't be processed. Make the web service send an
EnqueueDacsFail response in such cases.
Make the method write the contents of the dacs message to the console.
Detect and ignore duplicate incoming messages
Integration messages in Mobilengine integration solutions are exchanged synchronously: the
initiating system sends a single EnqueueDacs web service message at a time,
and waits for an acknowledging EnqueueDacsResponse from the receiving end
for each of the sent messages before it pushes the next message across the wire. If the
dacs in the incoming message is invalid (or its API key doesn't match),
the receiving end will respond with an EnqueueDacsFail SOAP fault, which
makes the outbound endpoint skip the message.
On the Dev Console Integration Edit outbound endpoint screen on the Backoffice site, you can configure how long the
endpoint should wait for a response after an EnqueueDacs, and re-insert the skipped messages into the message queue.
Network errors can mess up this system if the acknowledgement messages cannot get back to
the outbound endpoint, the Cloud in this case. The Cloud will re-send every
dacs that it doesn't get some sort of response for. This can result in
the same message getting delivered multiple times.
To safeguard against this, you can enhance the WdxService class a bit.
Make it store the ID of the last received message, then make the code compare it to the
latest received message ID and reject the message if the IDs
match.
Download the zipped project files
using System; namespace RockyJupiter.Mobilengine.Service { //Implement the service interface class WdxService: IWdx {private static string LastDacsid;//Key used to authenticate Mobilengine to the web service when sending data //This key can be specified on the Mobilengine Developer Console private static string keyAstroOut = "Very secret key"; public void EnqueueDacs(Dacs dacs) { //Return EnqueDacsFail on key mismatch //by throwing the appropriate FaultException if (dacs.Key != keyAstroOut) { Console.WriteLine("Authentication failed for key {0}", dacs.Key); throw new FaultException<EnqueueDacsFail> (new EnqueueDacsFail { dacsid = dacs.dacsid, Message = "Dacs authentication failed" }); }//Ignore the message if it is a duplicate if (dacs.dacsid == LastDacsid) { Console.WriteLine("Dacs {0} has already been processed, ignoring."); return; } //Store the package ID of the last received message LastDacsid = dacs.dacsid;//Write the contents of the incoming message to the console Console.WriteLine("Processing {0}:", dacs.dacsid); var statusUpdate = dacs.Content.Item; Console.WriteLine( "At {0} driver {1} changed the status of assignment {2} from {3} to {4}.", statusUpdate.changedAt, statusUpdate.driver.Value, statusUpdate.assignmentId, statusUpdate.oldStatus, statusUpdate.newStatus); } } }
In the Program.cs file, create a service host for
WdxService in the Main method.
Download the zipped project files
using System;
using System.Linq;
using System.ServiceModel;

//Fix the namespace of the project
namespace RockyJupiter.Mobilengine.Service
{
    class Program
    {
        static void Main(string[] args)
        {
            //Create a ServiceHost instance
            using (var serviceHost = new ServiceHost(typeof(WdxService)))
            {
                //Start the service
                serviceHost.Open();
                Console.WriteLine("The service is ready at {0},
                                  press enter to exit.",
                    serviceHost.Description.Endpoints.Single().Address);
                Console.ReadLine();
                //Close the ServiceHost instance to shut down the service
                serviceHost.Close();
            }
        }
    }
}
This is a bare-bones self-hosted solution: in the real world, the owner of the web service would most probably use IIS or WAS to host the WCF service.
Configure the service endpoint
In the App.config file, specify the endpoint to access the service. This
is the inbound counterpart to the outbound endpoint that you created for the integration
solution on the Mobilengine
Cloud.
Download the zipped project files
<?xml version="1.0" encoding="utf-8"?>
<configuration>
    <system.serviceModel>
      <services>
        <service name="RockyJupiter.Mobilengine.Service.WdxService">
          <endpoint name="BasicHttpBinding_IWdx"
                    address="http://localhost:8003"
                    binding="basicHttpBinding"
                    contract="RockyJupiter.Mobilengine.Service.IWdx"  />
        </service>
      </services>
    </system.serviceModel>
</configuration>
The
endpoint element also specifies that the WCF client uses the
RockyJupiter.Mobilengine.Service.IWdx service contract to communicate
with the service. This is part of the Wdx.cs file that you generated from
the WSDL using svcutil.exe, and then implemented in the
Program.cs file.
You're all done. The status updates that users of the Driver Task List dashboard form submit to the Mobilengine Cloud will get transferred to the console of the machine that listens at the URL specified in the web service.
Congratulations. You can now make your little Mobilengine gadgets talk to the whole wide world. If you also want them to listen in on conversations, scoot on over to the next section.
Test your completed integration solution
For your reference, this is how this particular outbound integration solution should work once you set up self-hosting:
-
Run the project in Visual Studio to start the web service. You should get the command line start-up message that you set up.
-
Open the Driver Task List dashboard form on your mobile device, and confirm a delivery with the Confirm
closebutton. Go ahead and tap the Load cargo and the Deliver cargoclosebuttons as they appear in the form.Figure 190. Make the integration solution send an integration message using the Driver Task List form
-
The workflow scripts that you've set up to run when you tap one of the
closebuttons also put together integration messages that include the status update details, using thestatusUpdate.dacsemschema, and then send it along over the integration solution. -
The integration messages reach the web service that you set up for Rocky Jupiter, which processes them, and displays their contents on the console.
Processing dacs 2bb8d5c666a24e85979b16d82d8b1cdb:
Driver Petar Hoyt changed the status of assignment 1c723ded-6d25-4212-bcbf-a92a7
31b0211 from Assigned to Confirmed.
Processing ca0359ea33cf48f8b654010ef25a4655:
Driver Petar Hoyt changed the status of assignment 1c723ded-6d25-4212-bcbf-a92a7
31b0211 from Confirmed to Loaded.
Processing ba146be3318647cdabeef6d9f237fa27:
Driver Petar Hoyt changed the status of assignment 1c723ded-6d25-4212-bcbf-a92a7
31b0211 from Loaded to Completed.
Check that message authentication works
You've set up message authentication, so why not test that it works as expected, just to be on the safe side?
Simulate an unauthorized integration message by going back to Backoffice site, to the endpoint-configuration screen, and deliberately modify the API key, then hit Save. Look what you've done.
Start the web service if you've shut it down, as above, and tap one of the task status-altering buttons on the Driver Task List mobile form to push an integration message through to the web service.
As per your integration solution setup, the console should display the following message.
The Backoffice site also logs the EnqueueDacsFail integration
message. Go to the Dev Console → Tasks screen, and check.
Figure 191. The authentication settings rejected your integration message as undeliverable. Revive it to try again.
Sweet. Now, enter the proper API key, and re-deliver the failed message to get the
integration solution back on track. Click the Revive link on
the Dev console → Tasks link to do this.
The contents of the message should get logged on the console as usual, and a new entry should appear on the Tasks screen.
And that's a wrap. Now you can sleep easy that whoever you hand over the completed
integration solution to will be able to receive integration messages from the Mobilengine
Cloud.


